Managing S3 Bucket Notifications with the Ceph Dashboard
Modern cloud-native applications increasingly rely on event-driven architectures — systems that react to changes in real time rather than polling for updates. Ceph's RADOS Gateway (RGW), the S3-compatible object storage layer in Ceph, supports Bucket Notifications, a powerful mechanism to push event information to external endpoints whenever objects are created, modified, or deleted in a bucket.
This blog post dives deep into how Ceph RGW bucket notifications work, what events you can subscribe to, how filters allow fine-grained control, and how the Ceph Dashboard UI makes managing notifications easier than ever. The Dashboard pages shown here are available beginning with the Tentacle release.
What Are Bucket Notifications? 
Fundamental Concepts 
Bucket Notifications allow an S3 bucket to automatically publish event data to configured destinations (called topics) whenever specific operations occur on objects inside that bucket. This is the same model used by AWS S3 event notifications — and Ceph RGW implements a compatible API.
The core workflow looks like this:
  Object operation (PUT/DELETE/COPY)
        │
        ▼
  Ceph RGW Bucket
        │  (matches event + filters)
        ▼
  Notification Topic (AMQP / Kafka / HTTP)
        │
        ▼
  External Consumer / Microservice
Common uses include:
- Image processing pipelines — trigger a Lambda/worker when a new image is uploaded.
- Data ingestion — notify a Kafka consumer when a new dataset file arrives.
- Audit and compliance — log every object deletion event to an external SIEM.
- Cache invalidation — invalidate CDN cache when an asset is overwritten.
Now let's see how we can configure and set up a topic with the step-by-step guide below.
1. Creating a Notification Destination 
Before you can attach a notification to a bucket, you need to create a Topic — the destination endpoint that receives the event data.
The Ceph Dashboard supports three types of topic endpoints:
| Endpoint Type | Protocol | Description |
|---|---|---|
| AMQP | amqp:// | RabbitMQ or any AMQP-compatible broker |
| Kafka | kafka:// | Apache Kafka topics |
| HTTP/HTTPS | http:// or https:// | Any webhook-compatible HTTP endpoint |
Topics are created using the AWS SNS-compatible API exposed by RGW (POST / with Action=CreateTopic), or through the Ceph Dashboard's Notification destination management interface.
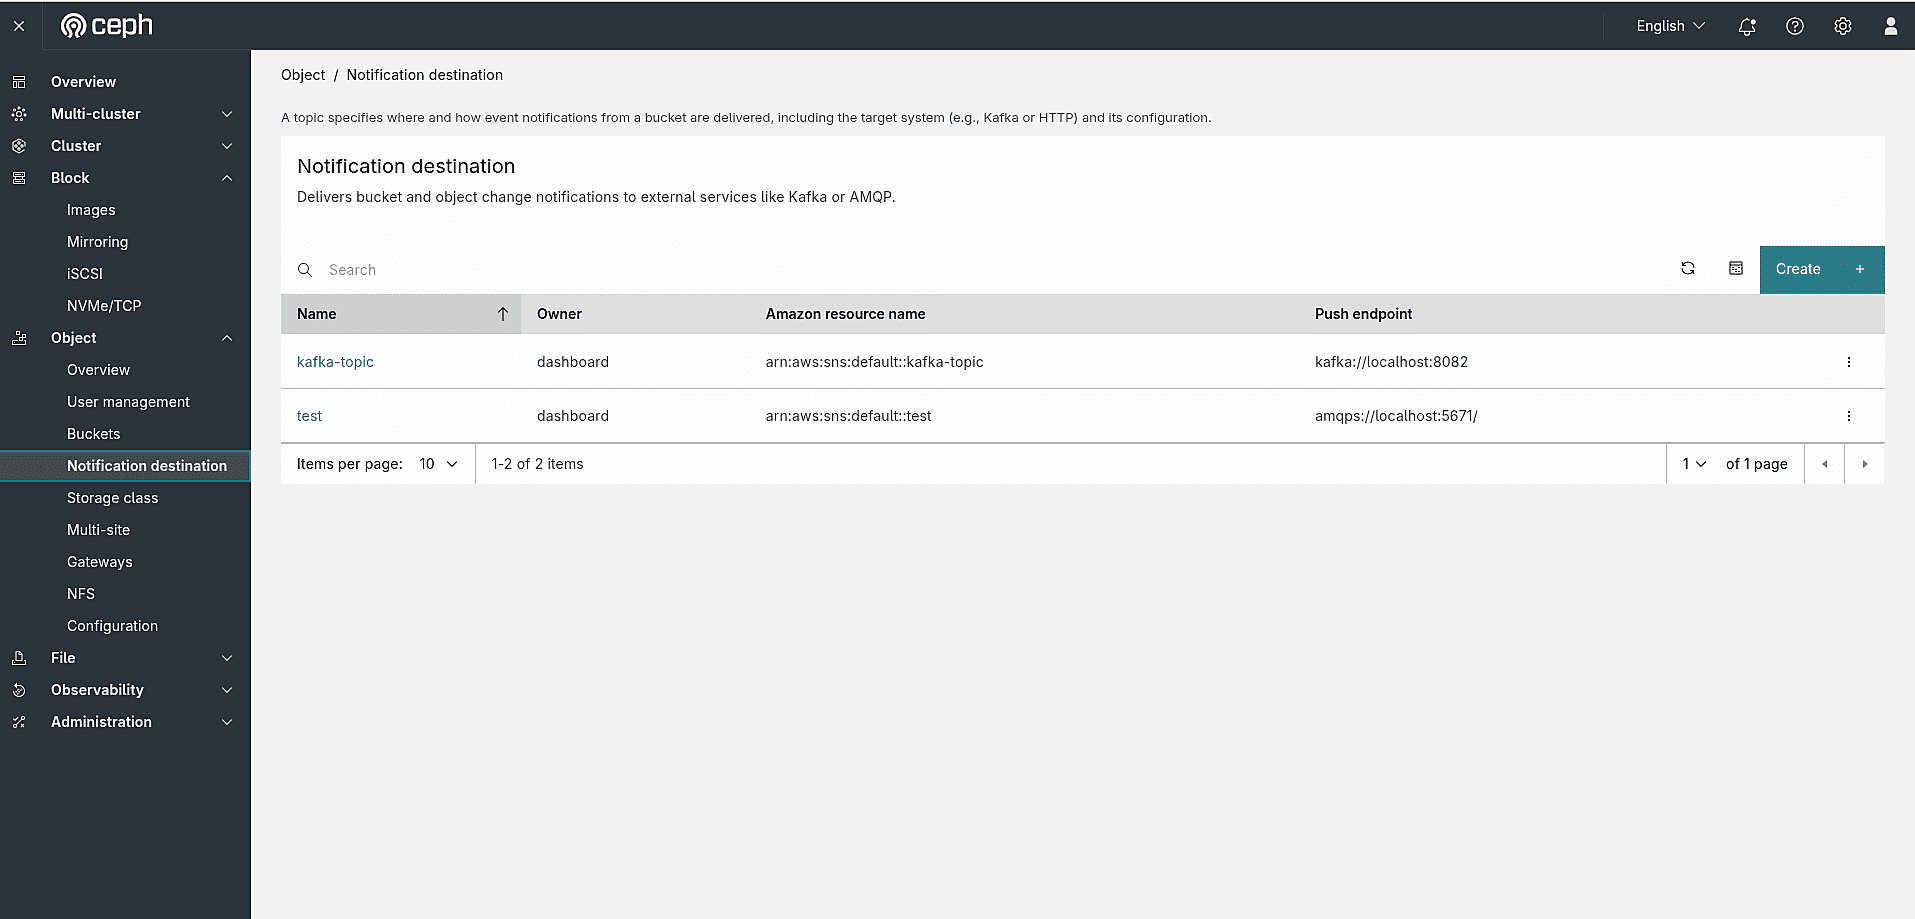
To get started, navigate to Object → Notification destination in the Ceph Dashboard sidebar. This page lists all existing notification destinations and allows you to create new ones.
Click the Create button in the top-right corner. You'll be prompted to fill in the following fields:
- Name: A unique identifier for this destination (e.g.,
kafka-topic). - Owner: The RGW user who owns this topic (e.g.,
dashboard). - Type: The push endpoint type — supported options include Kafka, AMQP, and HTTP.
- Push endpoint: The URL of the external service that will receive the notifications. Its scheme matches the type, for example
kafka://localhost:9082for Kafka.
Once submitted, the new destination will appear in the table with its Name, Owner, Amazon resource name (ARN), and Push endpoint. RGW generates the ARN in the format arn:aws:sns:<zonegroup>:<tenant>:<name>, so a topic created by a user without a tenant in the default zonegroup is arn:aws:sns:default::<name>.
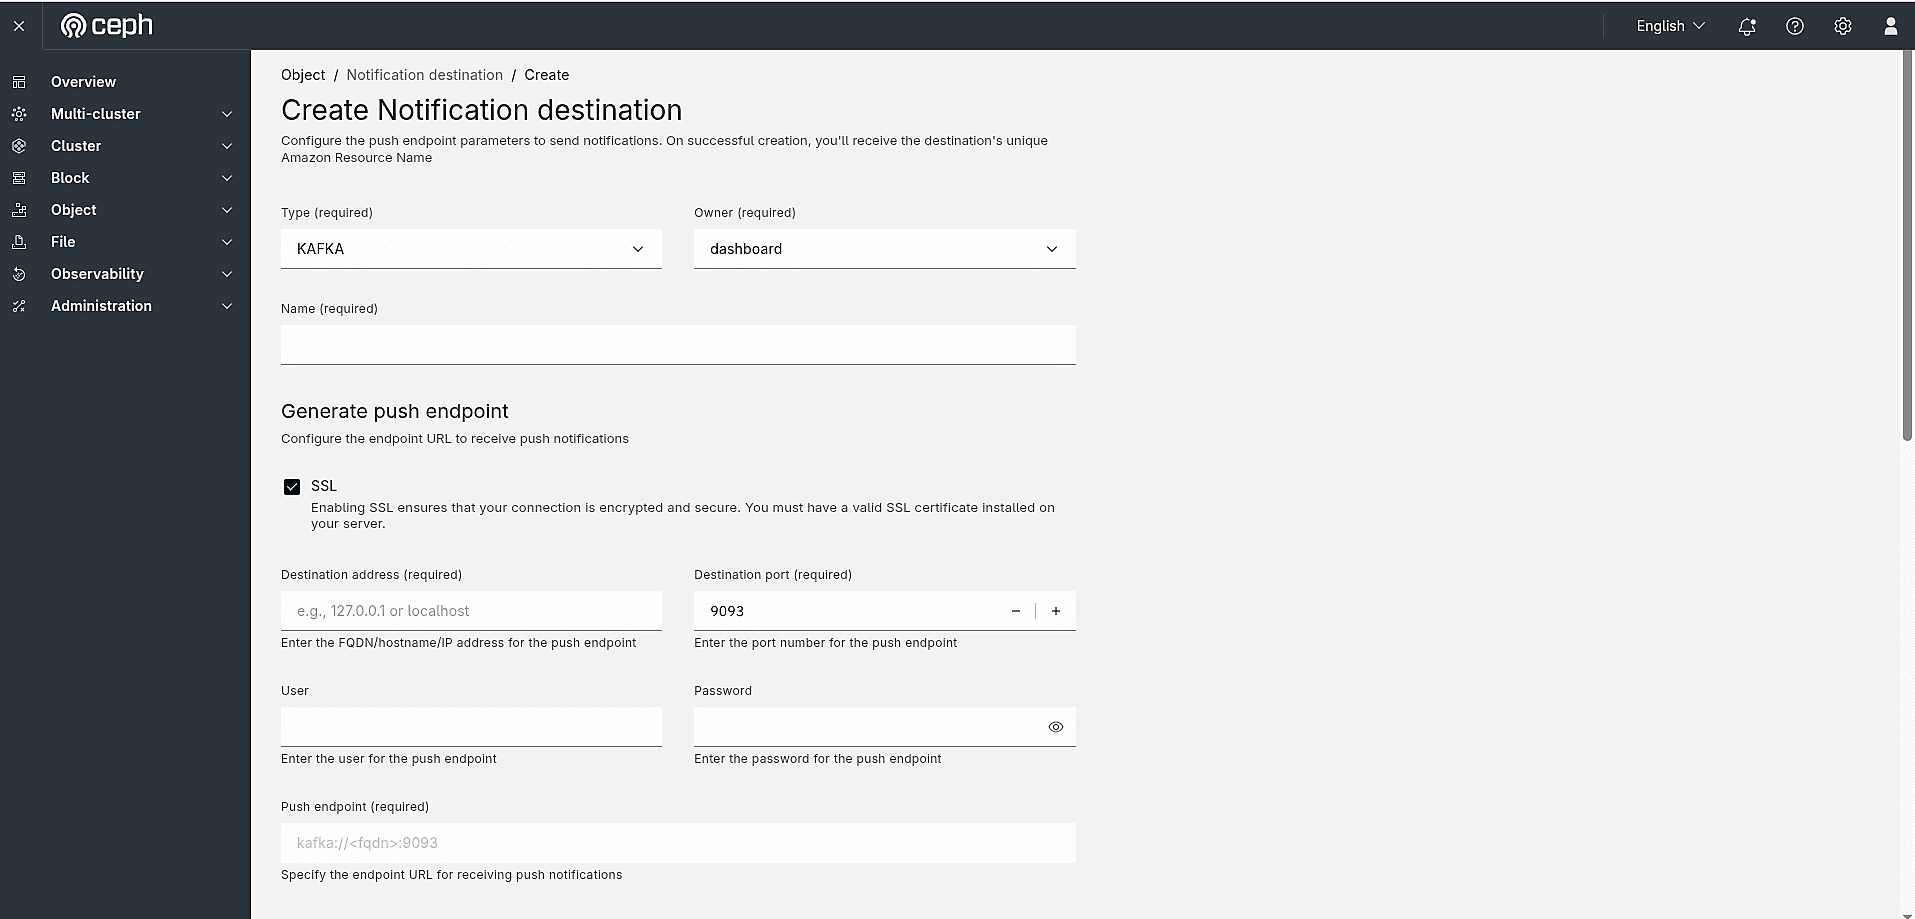 Figure: Step 1 - Filling in the basic fields (Type, Owner, Name) and configuring the push endpoint.
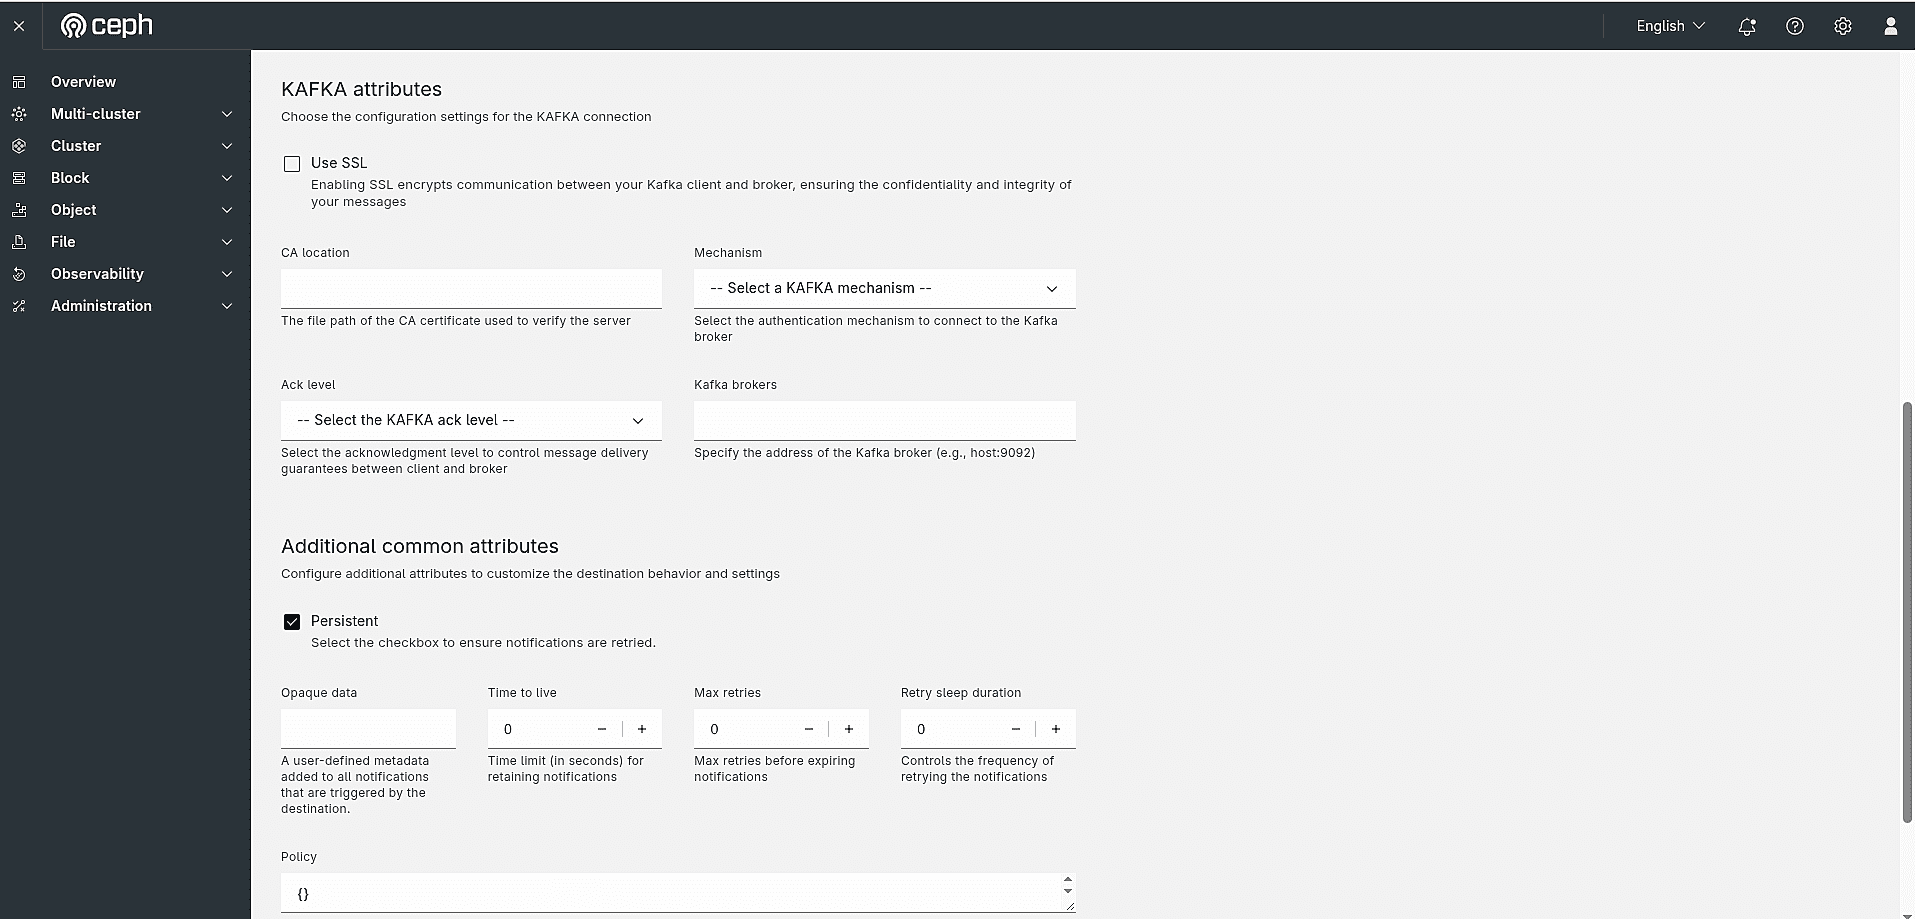 Figure: Step 2 - Configuring endpoint-specific attributes (e.g., Kafka brokers, SSL, ACK level).
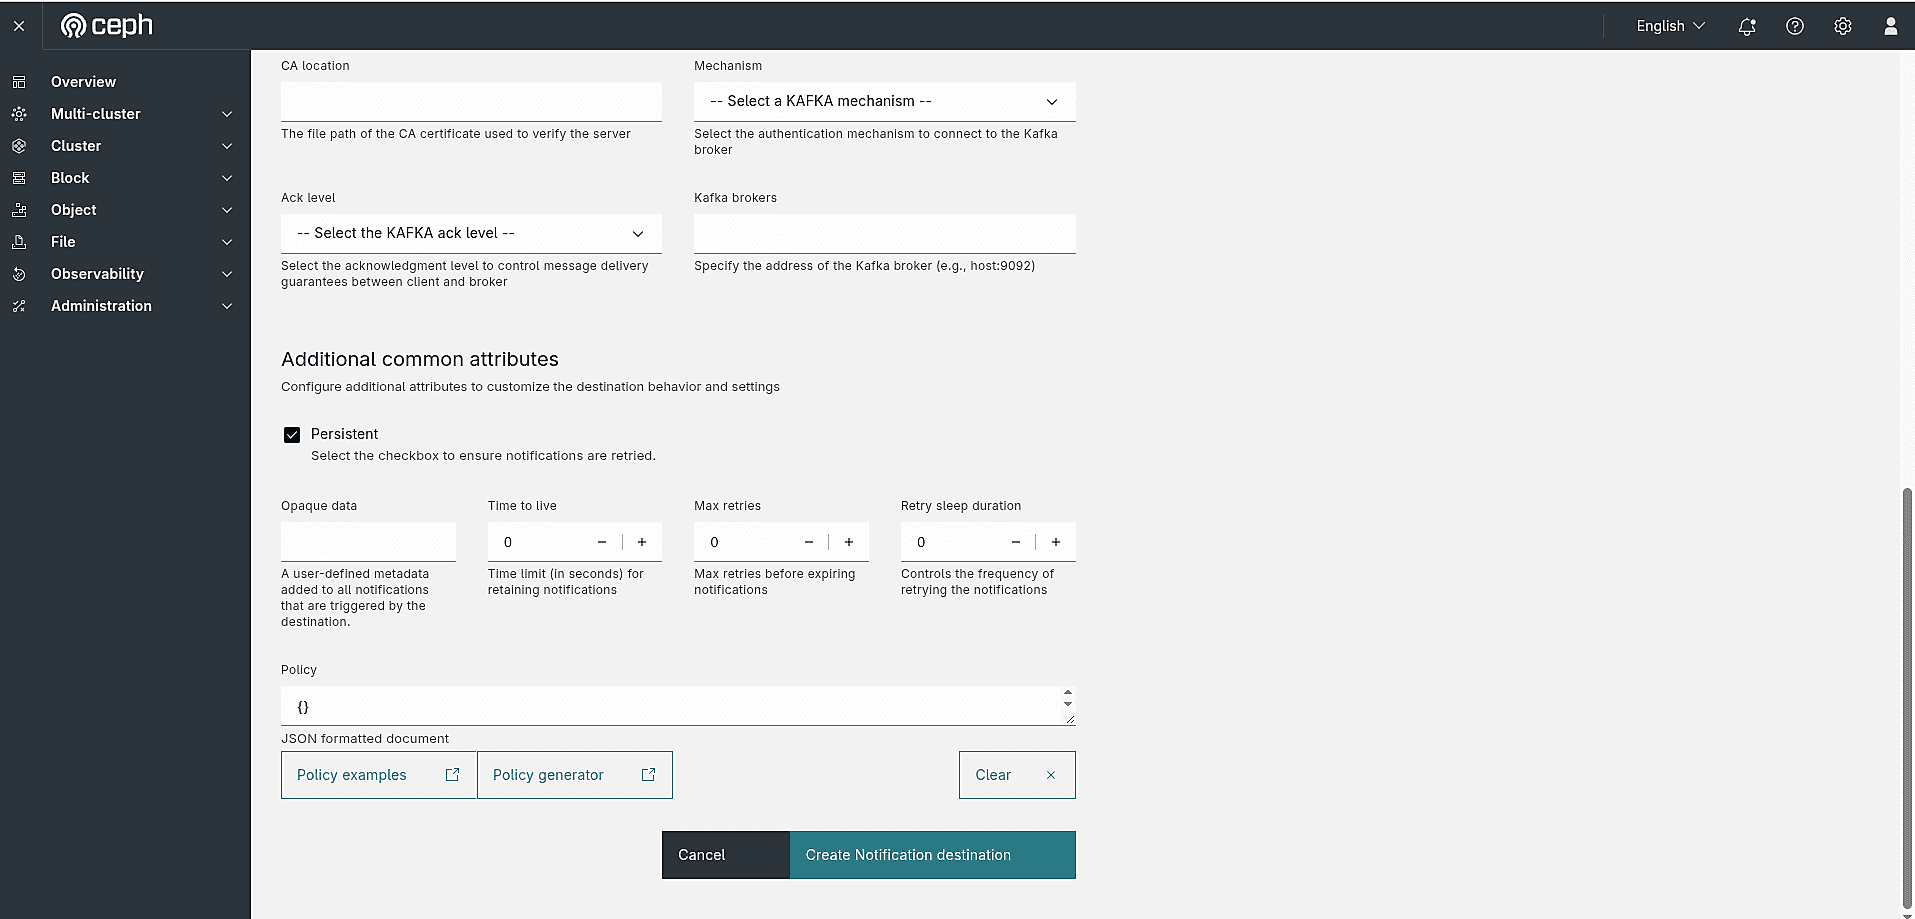 Figure: Step 3 - Setting additional common attributes (Persistent, TTL, Max retries) and submitting.
2. Exploring the Notification Destination Detail View 
Once a notification destination is created, you can click on its name in the list to open its detail view. The detail page for a topic (e.g., kafka-topic) is organized into three tabs:
- Overview — shows the topic's core properties (name, owner, push endpoint, ARN).
- Policies — shows the topic's access policy.
- Subscribed buckets — lists all buckets that have an active notification linked to this destination.
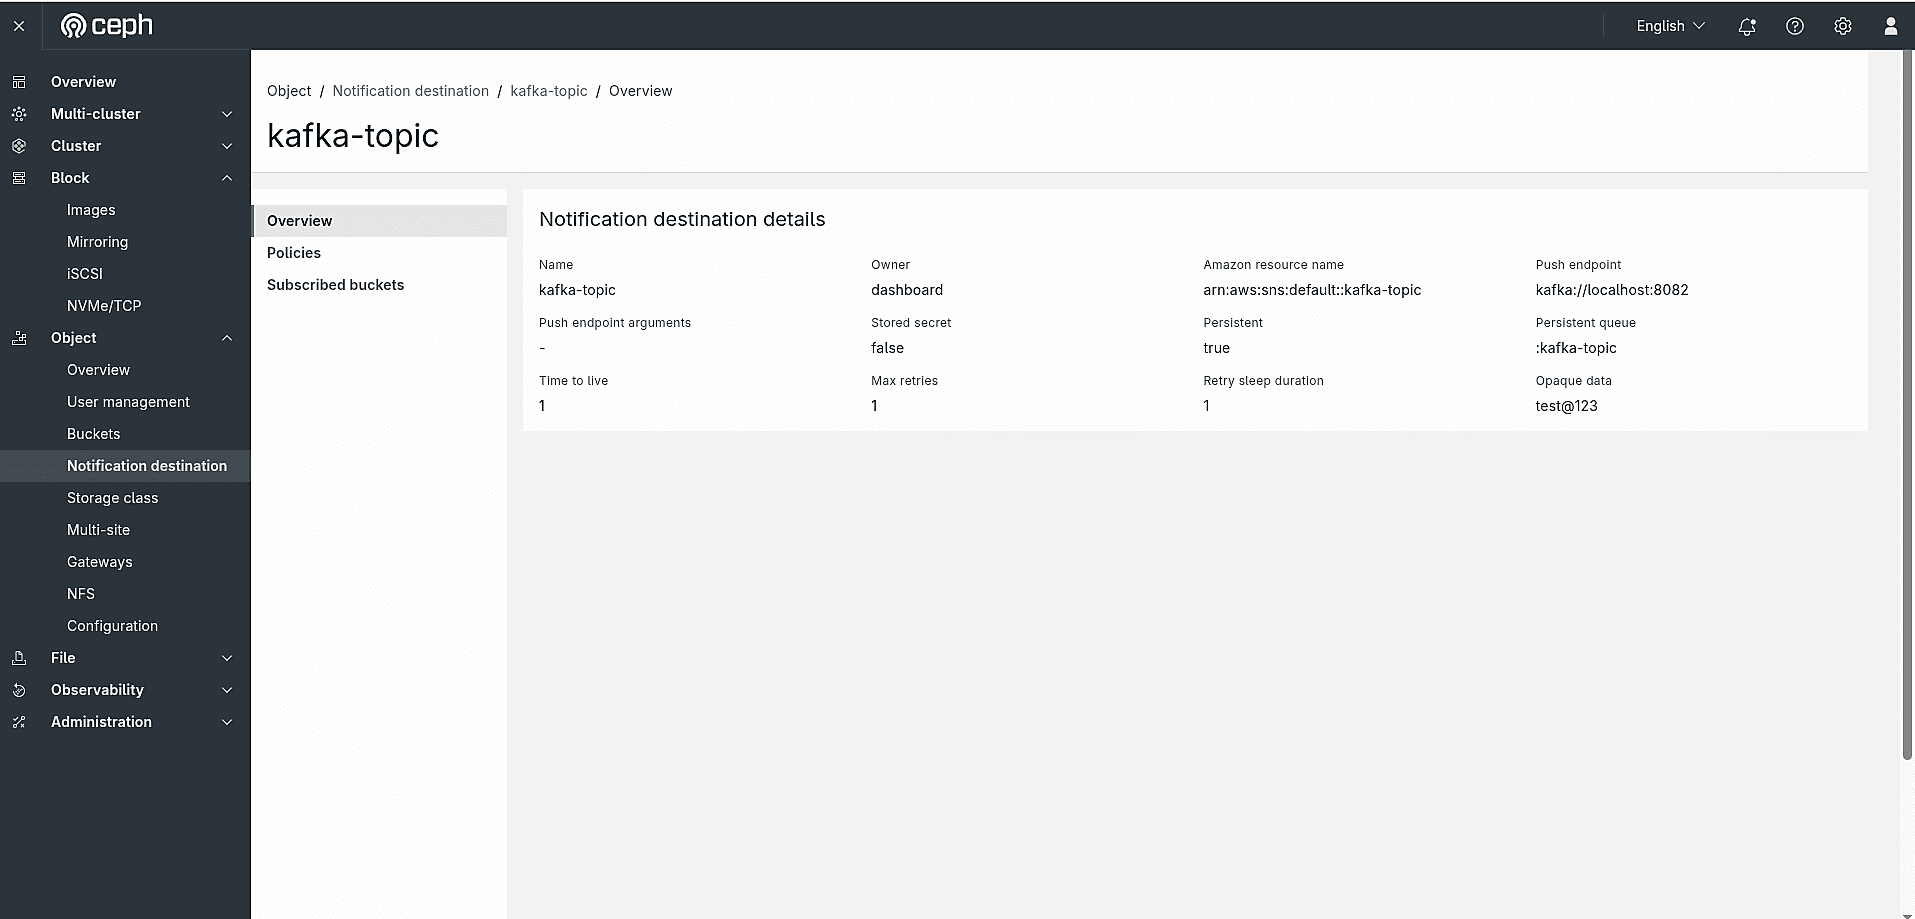 Figure: Detail view of
kafka-topic showing the Overview, Policies, and Subscribed buckets tabs.
Policies Tab 
The Policies tab shows the topic's access policy, a JSON document similar to a bucket policy. It controls which users other than the owner can use the topic, for example to read its attributes (sns:GetTopicAttributes) or to attach bucket notifications to it (sns:Publish). Each row shows a Key and its corresponding Value.
This topic has no policy, so the Policy field shows {}, an empty JSON object. Configuring bucket notifications doesn't change the policy. By default, other users can attach notifications to a topic that has no policy; set rgw_topic_require_publish_policy to true to require one.
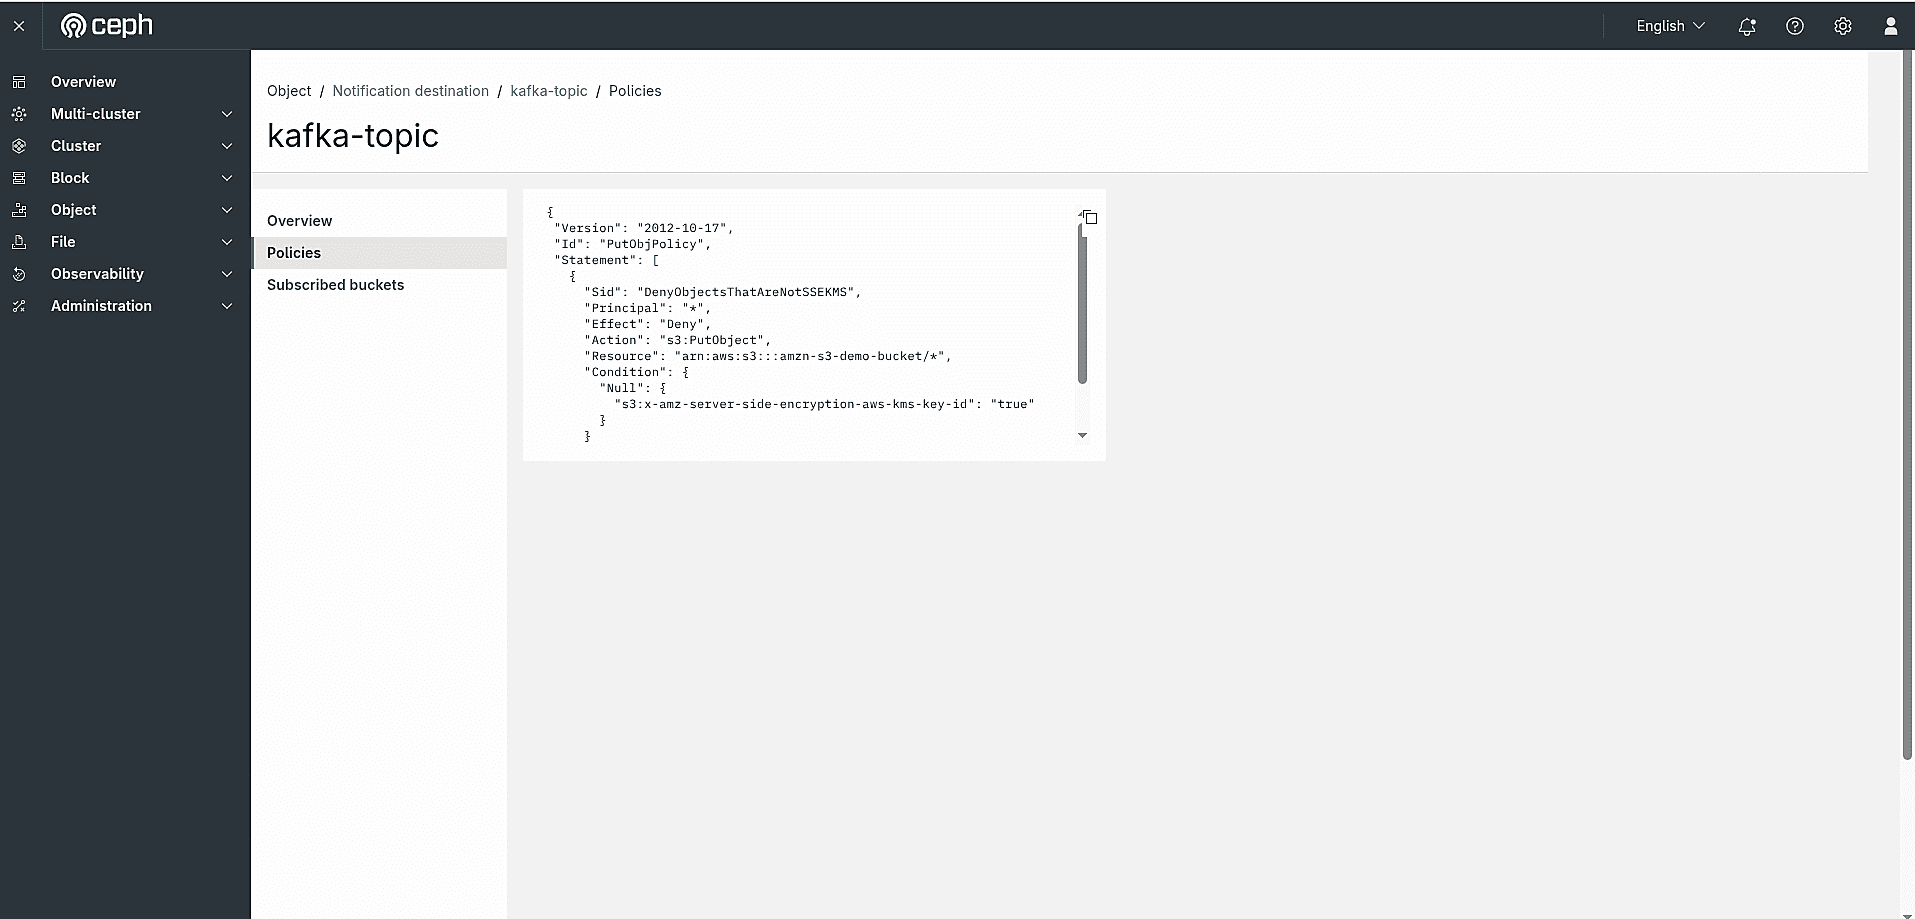 Figure: Policies tab for
kafka-topic showing an empty policy.
Subscribed Buckets Tab 
The Subscribed buckets tab shows which buckets are actively sending event notifications to this destination. This list will be empty until a bucket notification is created and linked to this topic.
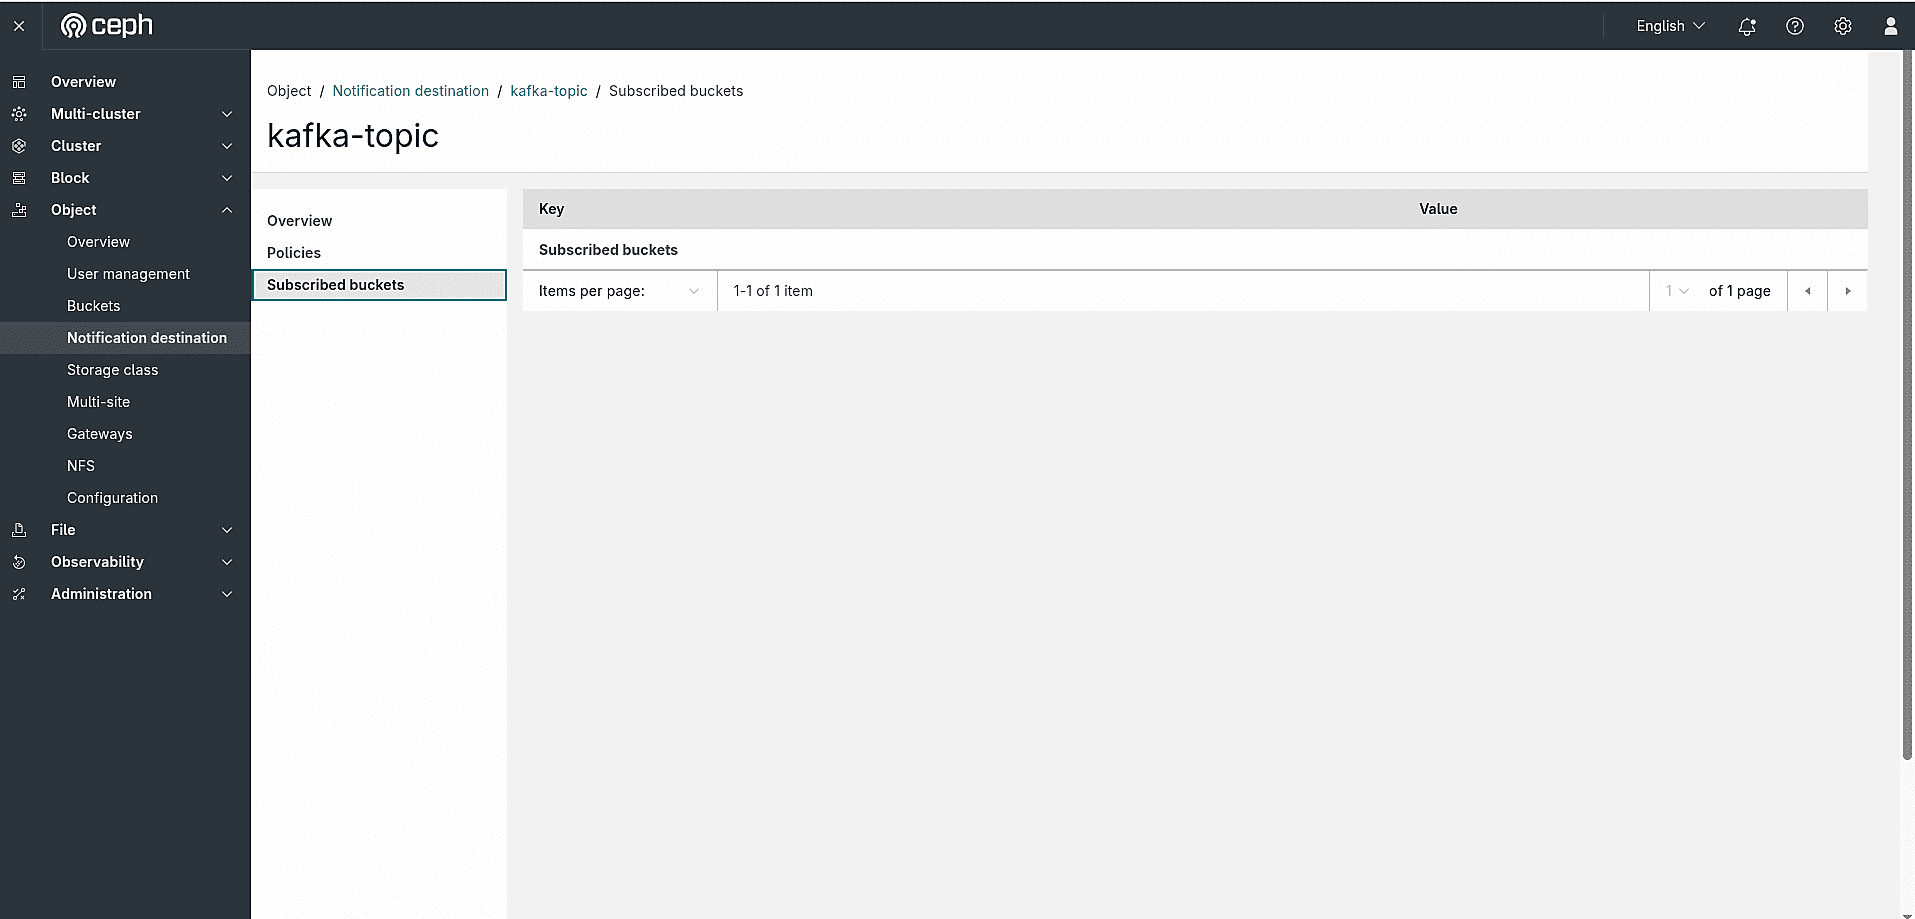 Figure: Subscribed buckets tab for
kafka-topic showing no buckets subscribed yet.
The list fills in automatically once you configure a bucket notification that references this destination, as described in section 4.
3. Managing a Notification Destination 
In addition to creating notification destinations, the Ceph Dashboard also lets you edit and delete them at any time from the Object → Notification destination list page.
Editing a Notification Destination 
To edit an existing destination, click the ⋮ action menu on the right side of the destination row and select Edit. This opens the Edit Notification destination form, which is pre-populated with the current values and exposes the full set of configuration options:
Basic fields (read-only after creation):
- Type — the endpoint protocol:
HTTP,Kafka, orAMQP. - Owner — the RGW user that owns this topic (e.g.,
dashboard). - Name — the unique topic name (e.g.,
kafka-topic).
Generate push endpoint — builds the push endpoint URL from individual components:
- SSL — encrypt the connection to the endpoint.
- Verify SSL — enforce server certificate validation (requires a valid SSL certificate).
- Cloud events — for HTTP endpoints, add the HTTP headers defined by the S3 CloudEvents specification to each notification.
- Destination address — the FQDN or IP of the target service (e.g.,
localhost). - Destination port — the port number (e.g.,
9082); the final Push endpoint URL is assembled automatically (e.g.,kafka://localhost:9082).
Additional common attributes — fine-tune delivery behavior:
- Persistent — when checked, RGW commits each notification to a queue and sends it asynchronously, retrying until the destination acknowledges it. When unchecked, RGW sends each notification as part of the operation that triggered it, which adds the round trip to that operation's latency, and doesn't retry.
- Opaque data — user-defined metadata attached to every notification sent by this destination.
- Time to live — time limit in seconds for retaining undelivered notifications. Persistent topics only.
- Max retries — maximum number of delivery attempts before a notification is discarded. Persistent topics only.
- Retry sleep duration — delay in seconds between consecutive retry attempts. Persistent topics only.
- Policy — a JSON-formatted access policy document for this topic. Use the Policy examples or Policy generator links to build a valid policy.
Once you have made your changes, click Edit Notification destination to save them.
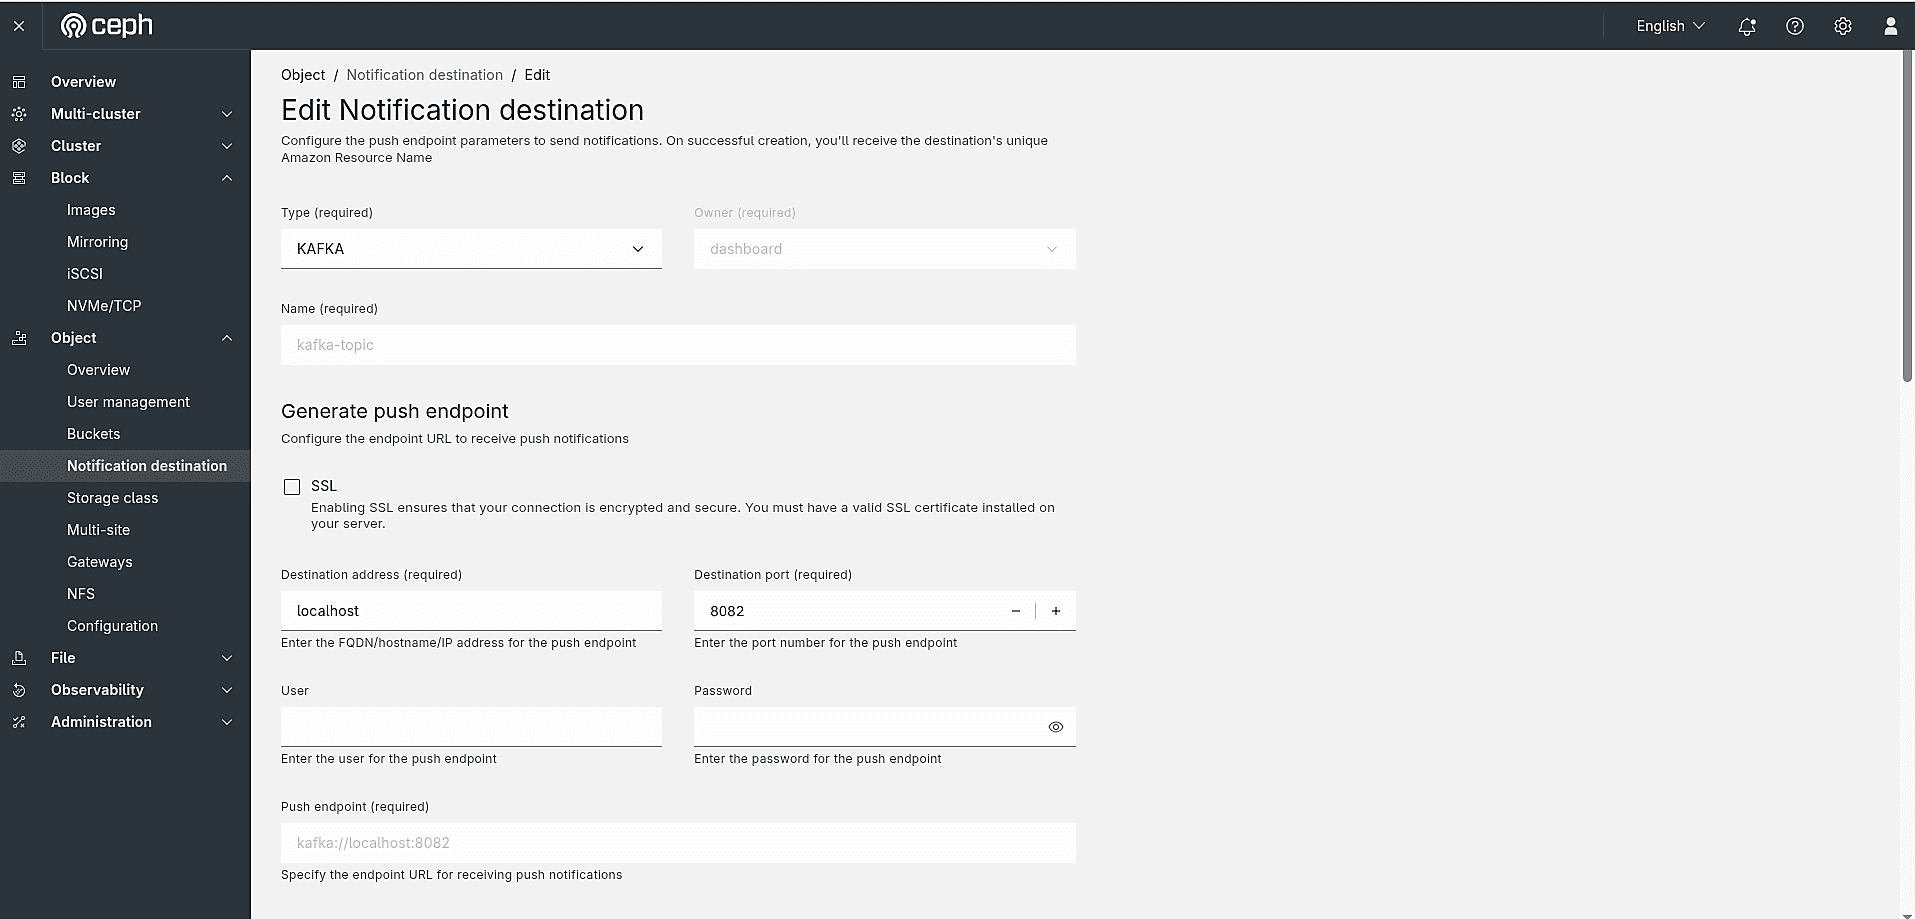 Figure: Edit Notification destination form — basic fields and Generate push endpoint section for
kafka-topic.
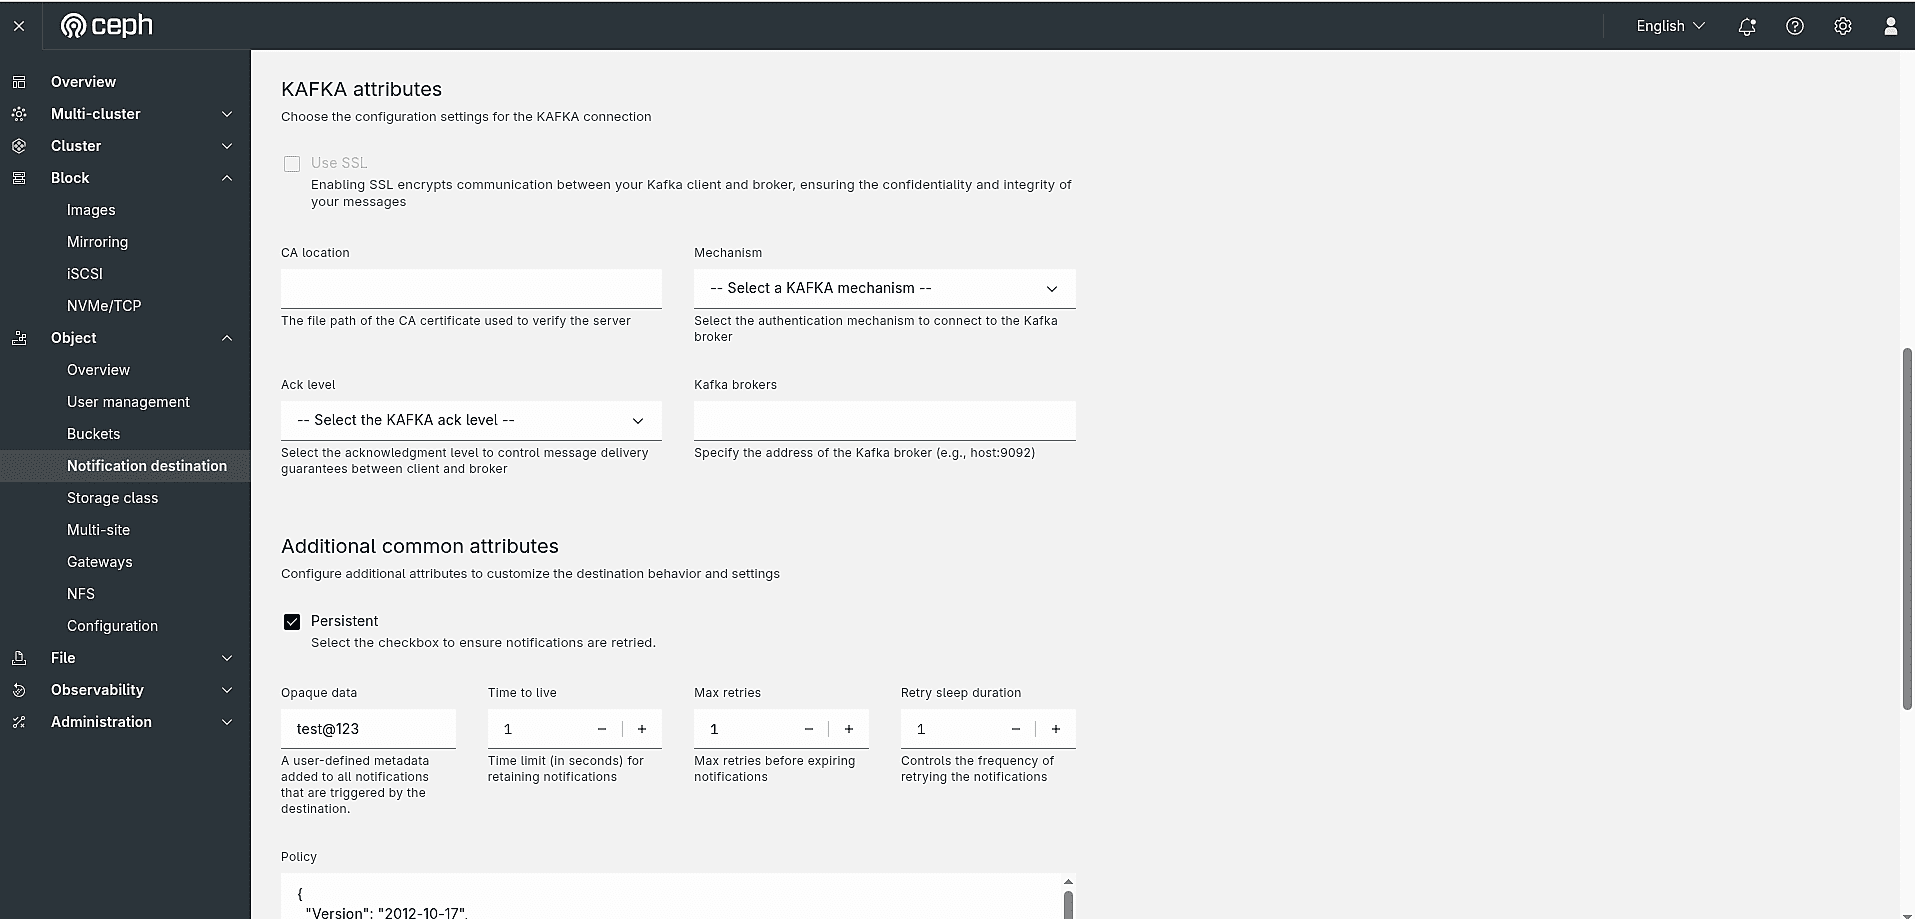 Figure: Edit Notification destination form — endpoint-specific attributes (Kafka/AMQP/HTTP) section.
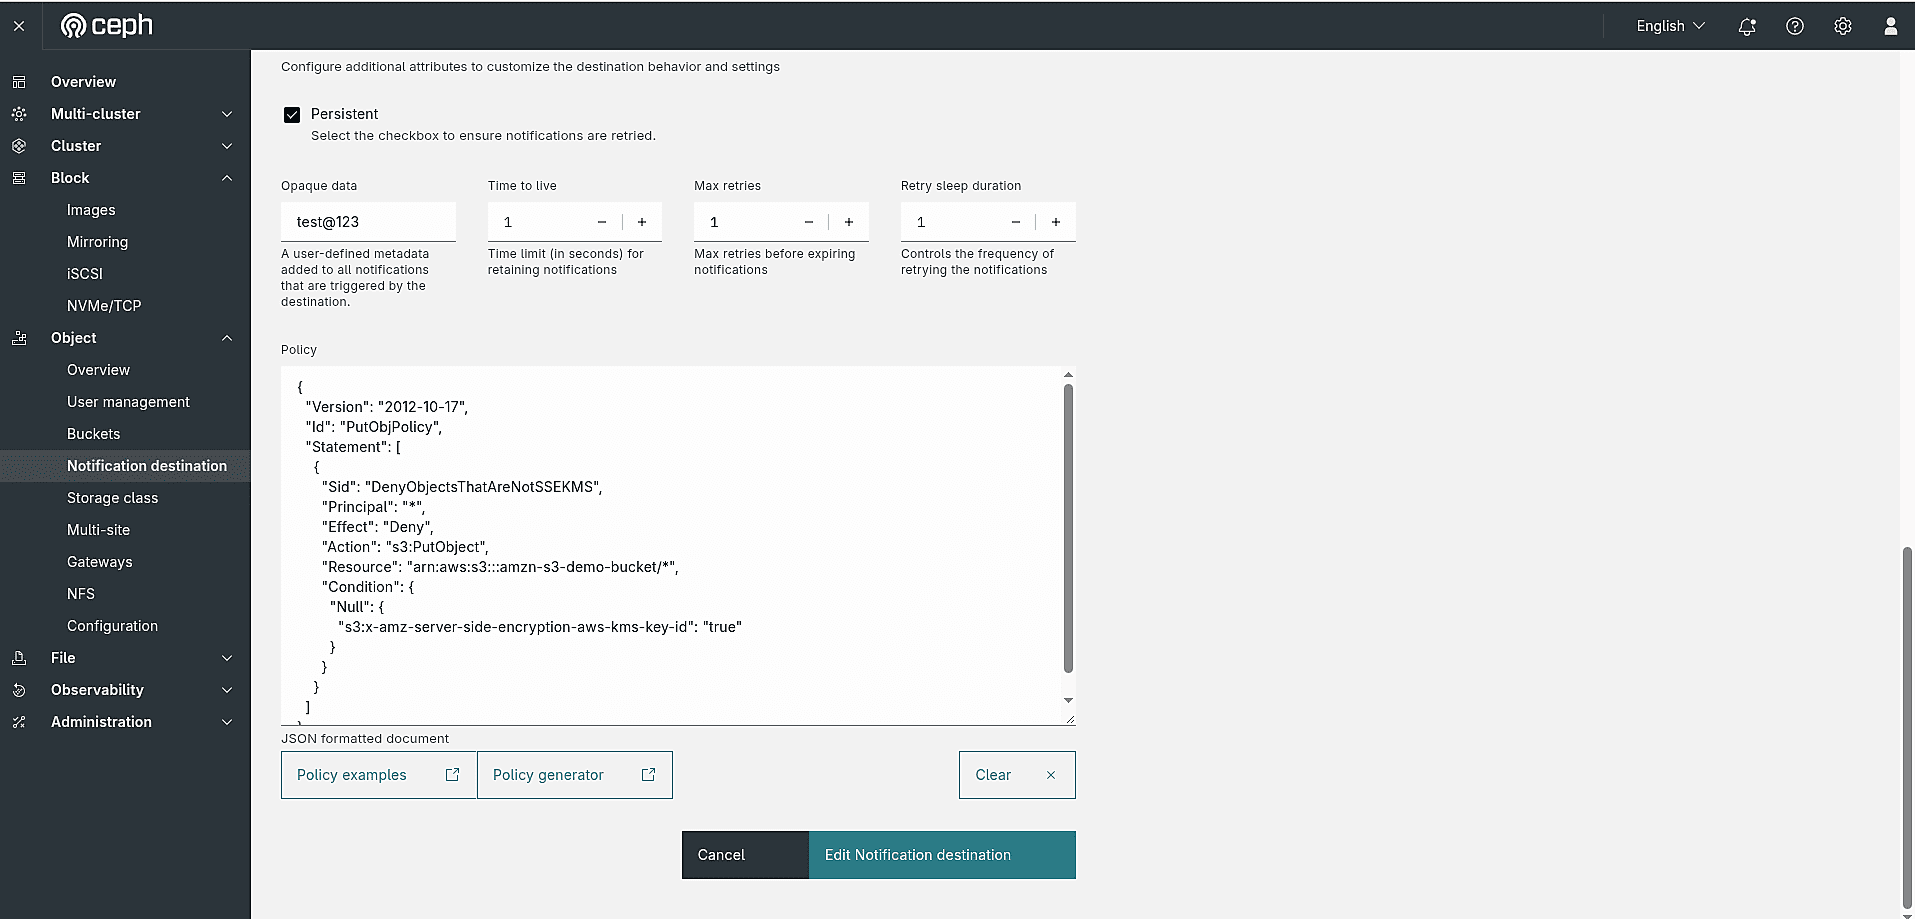 Figure: Edit Notification destination form — Additional common attributes (Persistent, TTL, Max retries, Policy).
Deleting a Notification Destination 
To delete a destination, click the ⋮ action menu on the destination row and select Delete. A confirmation dialog will appear asking:
Delete Notification destination Are you sure that you want to delete kafka-topic?
The Delete Notification destination button is intentionally disabled until you check the "Yes, I am sure." checkbox — this two-step confirmation prevents accidental deletion. Once checked, the button turns red and becomes active. Click it to permanently remove the destination.
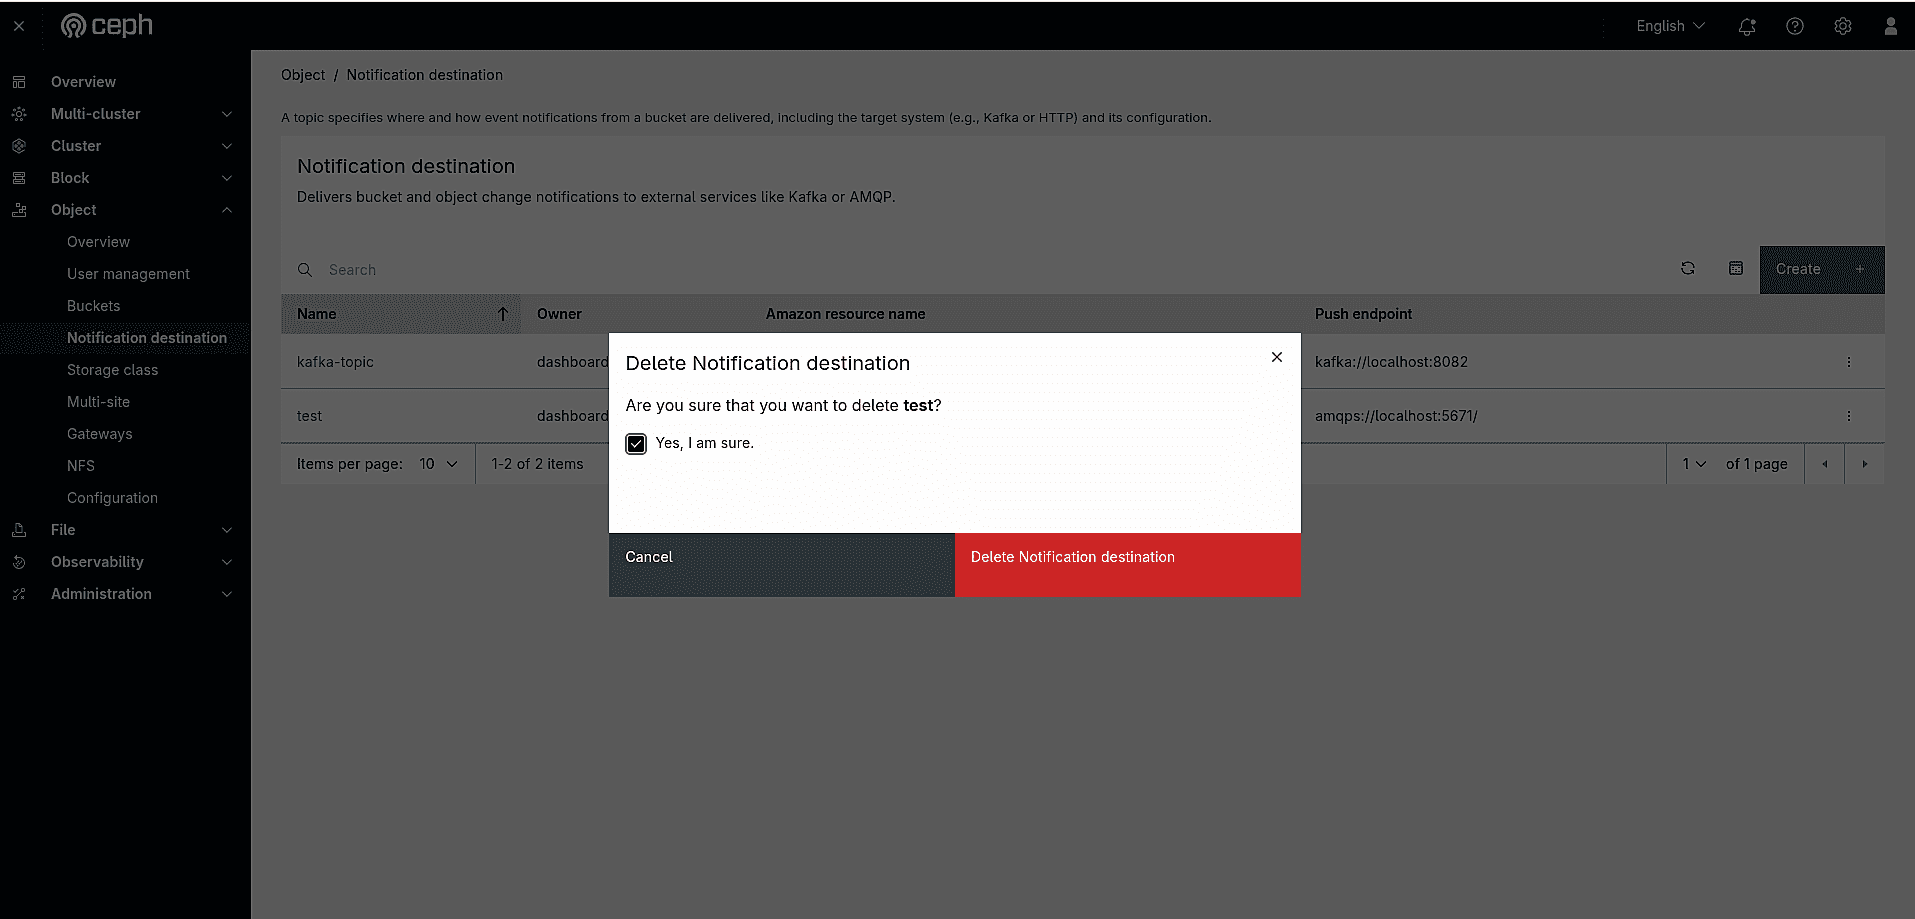 Figure: Delete Notification destination confirmation dialog for
kafka-topic, requiring the "Yes, I am sure." checkbox before the Delete button activates.
Note: Deleting a notification destination does not automatically remove bucket notifications that reference it. Make sure no active bucket notifications are using this topic before deleting it, otherwise those notifications will silently fail.
4. Notification Configuration 
With the notification destination created, the next step is to attach a Notification configuration to a specific bucket. This wires a bucket's object events to the topic so that RGW will push a notification every time a matching event occurs. Each bucket can have multiple independent notification configurations targeting different topics and event types.
Navigate to Object → Buckets, click on the bucket name (e.g., testbucket), and select the Notifications tab in the left sidebar. Click the Create button to open the Create Notification configuration dialog.
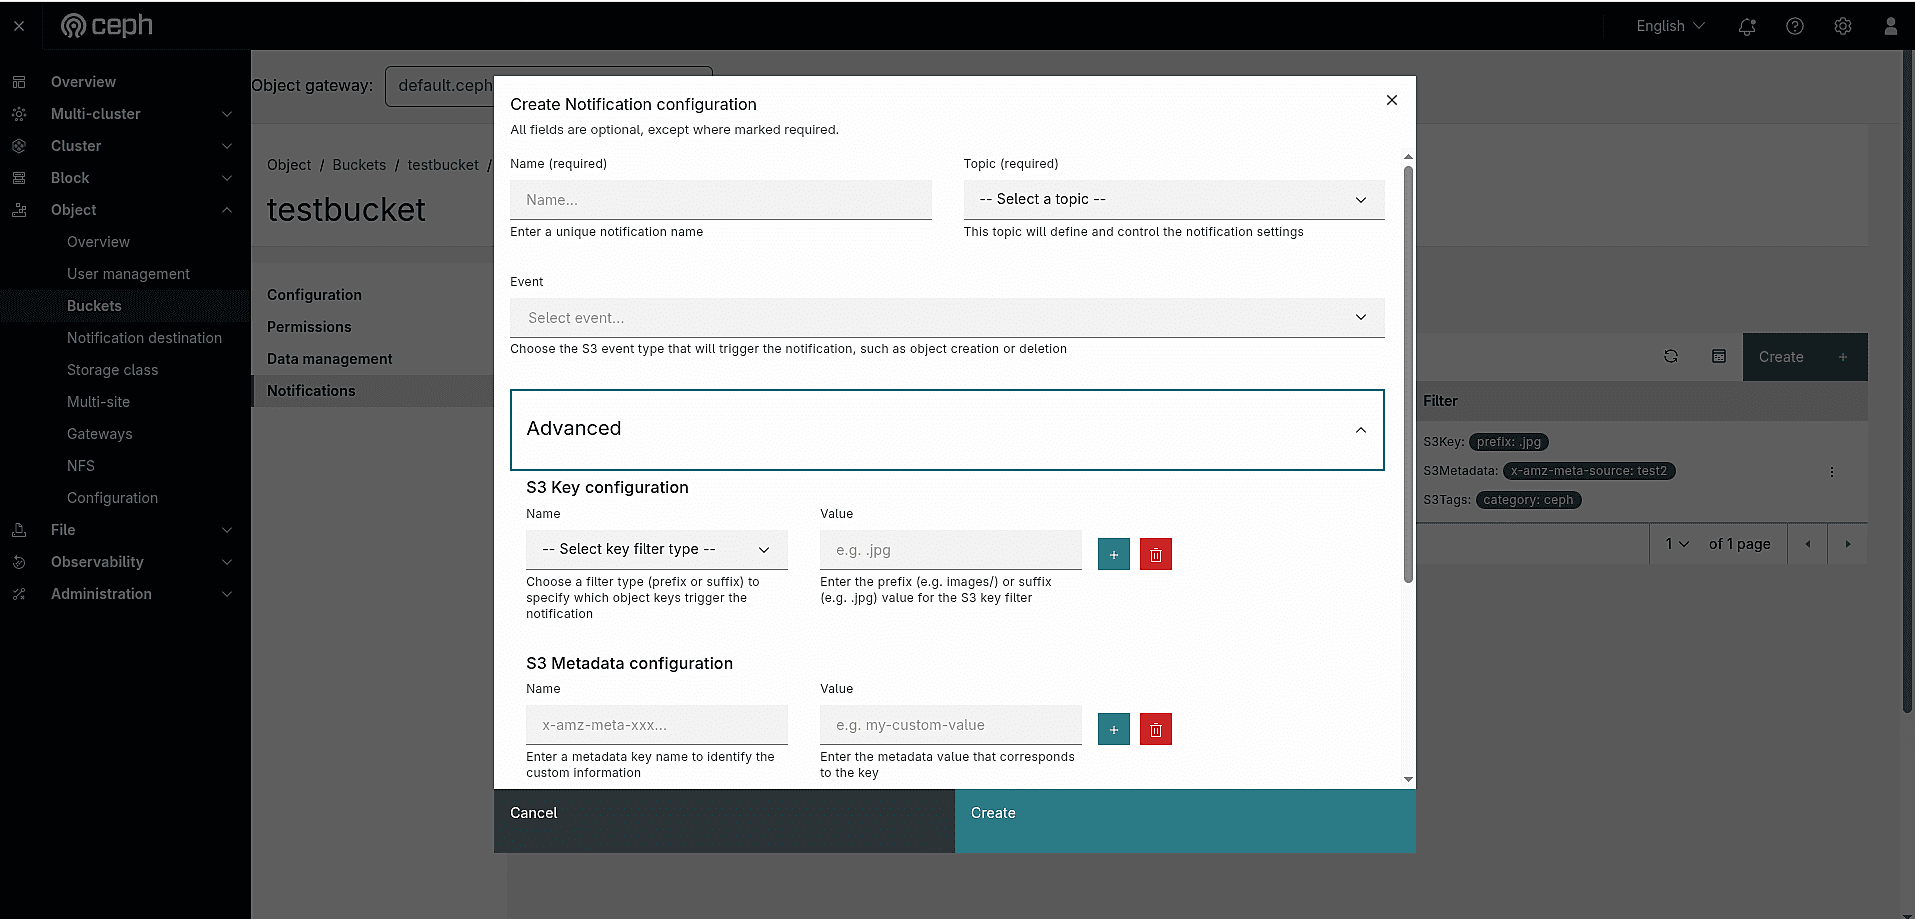 Figure: Create Notification configuration dialog for
testbucket, showing the Name, Topic, Event, and Advanced filter fields.
All fields are optional, except where marked required.
Required Fields 
| Field | Description |
|---|---|
| Name | A unique name for this notification configuration. |
| Topic | Select the notification destination (topic) that will receive the events. This topic defines and controls the notification settings. |
Event 
| Field | Description |
|---|---|
| Event | Choose the S3 event type that will trigger this notification (e.g., object creation, object deletion). Leave empty to receive all event types. |
Advanced Filters 
Expand the Advanced section to apply fine-grained filters that control which specific objects trigger the notification. All filter fields accept multiple entries using the + button.
S3 Key Configuration 
Filters notifications by object key name using a prefix or suffix match.
| Field | Description |
|---|---|
| Name | Select the filter type — prefix to match the start of the key, or suffix to match the end (e.g., .jpg). |
| Value | The prefix or suffix value to match against object keys (e.g., images/ for a prefix, .jpg for a suffix). |
S3 Metadata Configuration 
Filters notifications based on custom object metadata headers.
| Field | Description |
|---|---|
| Name | The metadata key name (e.g., x-amz-meta-environment). |
| Value | The metadata value to match (e.g., my-custom-value). |
S3 Tags Configuration 
Filters notifications based on object tags.
| Field | Description |
|---|---|
| Name | The tag key to match (e.g., backup-status). |
| Value | The tag value to match (e.g., completed). |
Click Create to save the notification configuration. Once created, it will appear in the Notifications table for that bucket with the following columns:
| Column | Description |
|---|---|
| Name | The unique name of this notification configuration. |
| Destination | The ARN of the topic that receives the events (e.g., arn:aws:sns:default::test). |
| Event | The S3 event type badge (e.g., s3:ObjectCreated:*). Empty means all events. |
| Filter | A summary of the active S3 key, metadata, or tag filters (e.g., S3Key: suffix .jpg). |
RGW will now forward events matching the configured event type and filters to the selected topic.
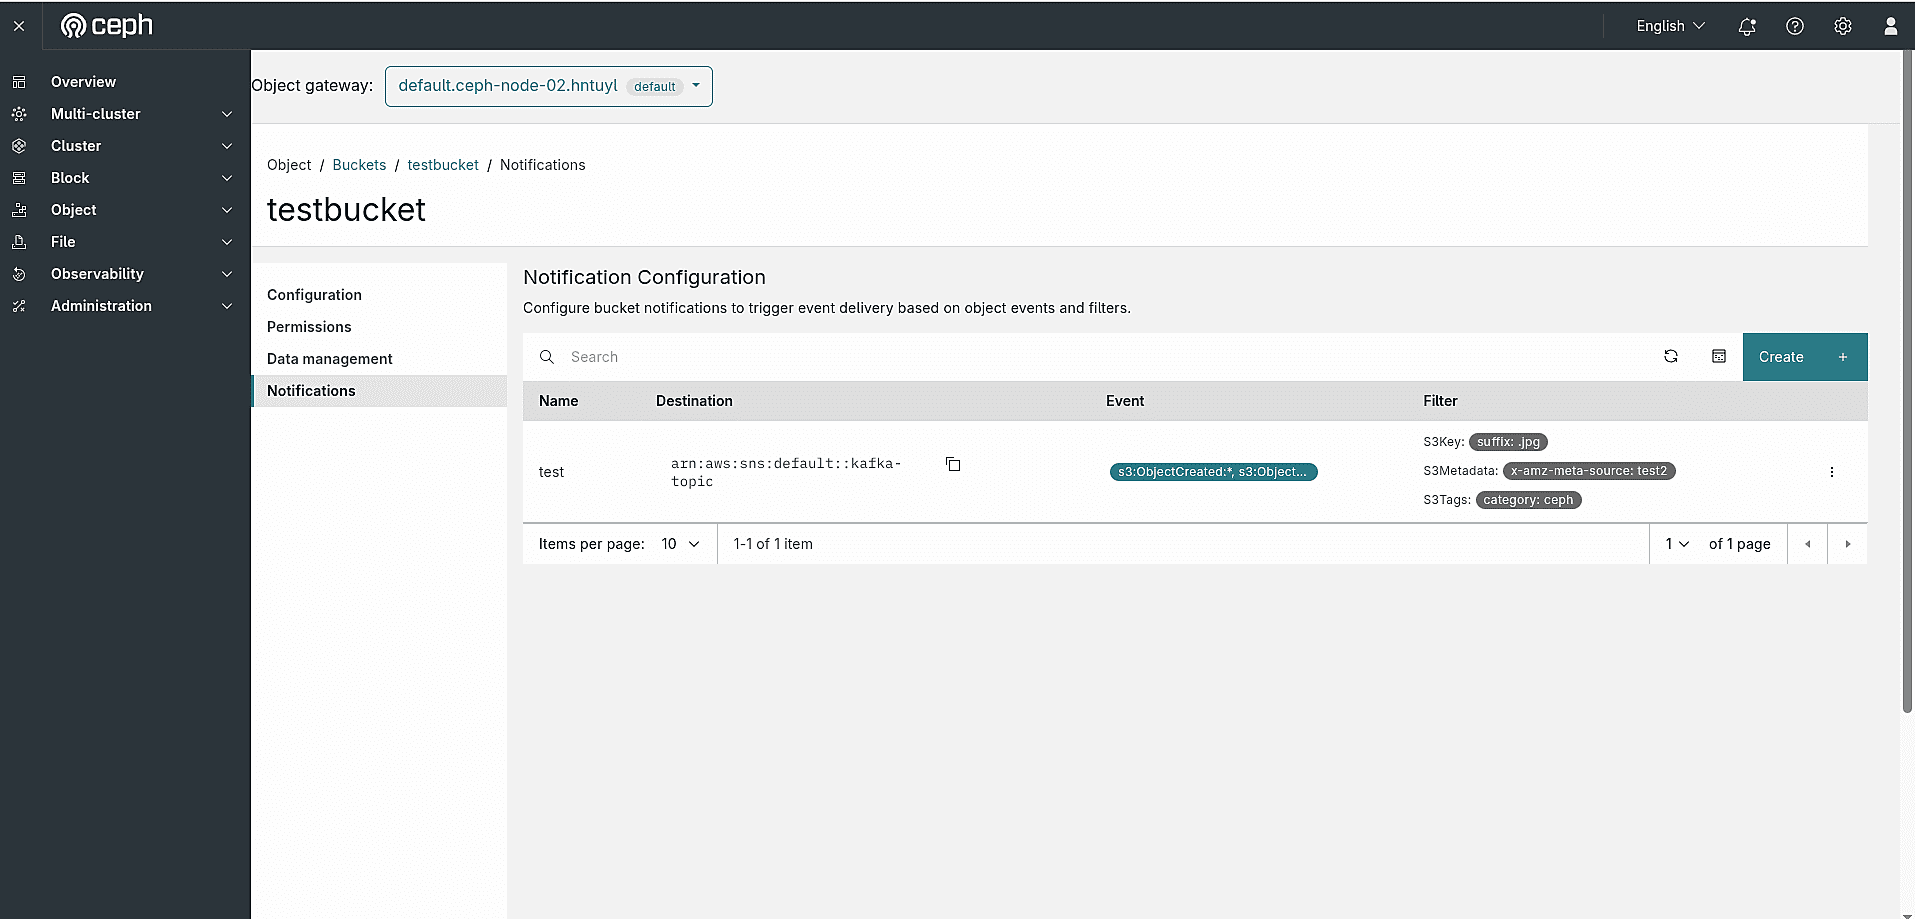 Figure: Notification Configuration table for
testbucket showing the created notification test targeting arn:aws:sns:default::test with event s3:ObjectCreated:* and S3 key suffix filter .jpg.
Editing a Notification Configuration 
To update an existing notification, click the ⋮ action menu at the end of the notification row and select Edit. The Edit Notification configuration dialog opens pre-populated with the current settings — the same form used during creation, with all fields editable except Name (which is fixed after creation).
The pre-filled values reflect what was configured at creation time:
- Name — read-only; the unique notification name (e.g.,
test). - Topic — the currently linked topic ARN (e.g.,
arn:aws:sns:default::test); can be changed to redirect events to a different destination. - Event — the event type filter; can be updated or cleared to match all events.
- Advanced filters — all S3 Key, Metadata, and Tags filter rules are shown and fully editable. For example, an existing S3 Key filter of
suffix: .jpgwill be displayed and can be modified or removed.
Click Edit to save the changes. The Notifications table will immediately reflect the updated destination, event, and filter values.
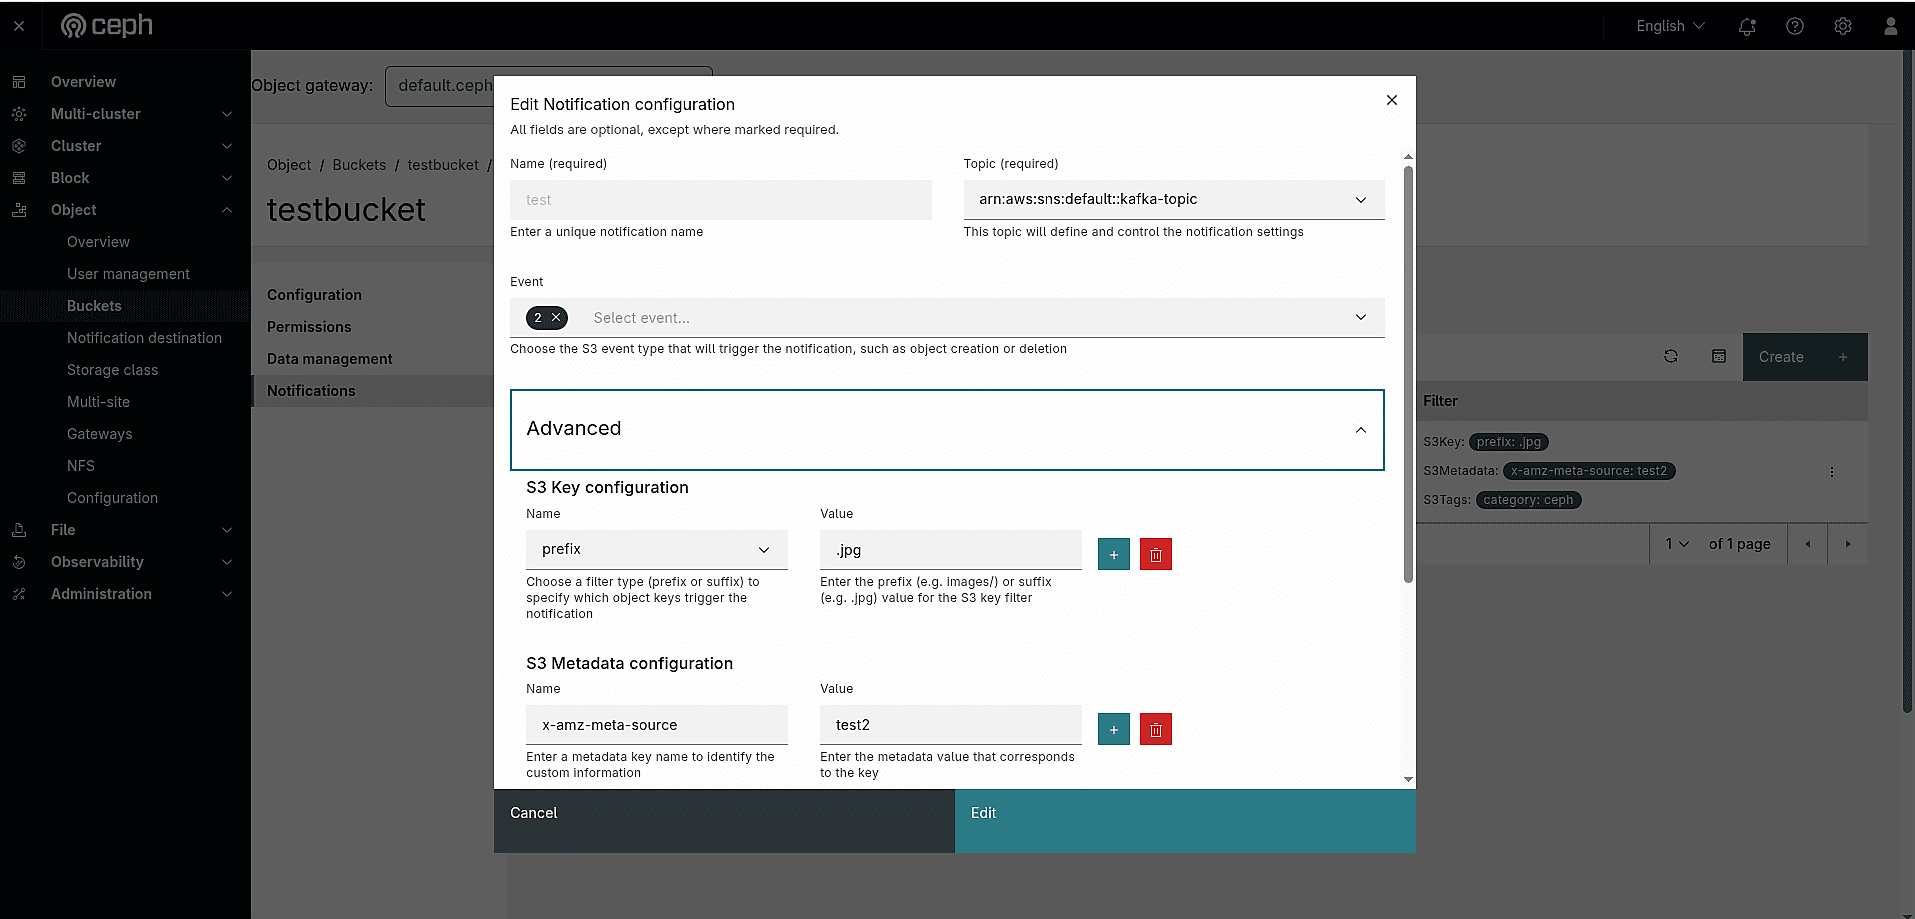 Figure: Edit Notification configuration dialog for
test — Name (read-only), Topic, and Event fields pre-populated.
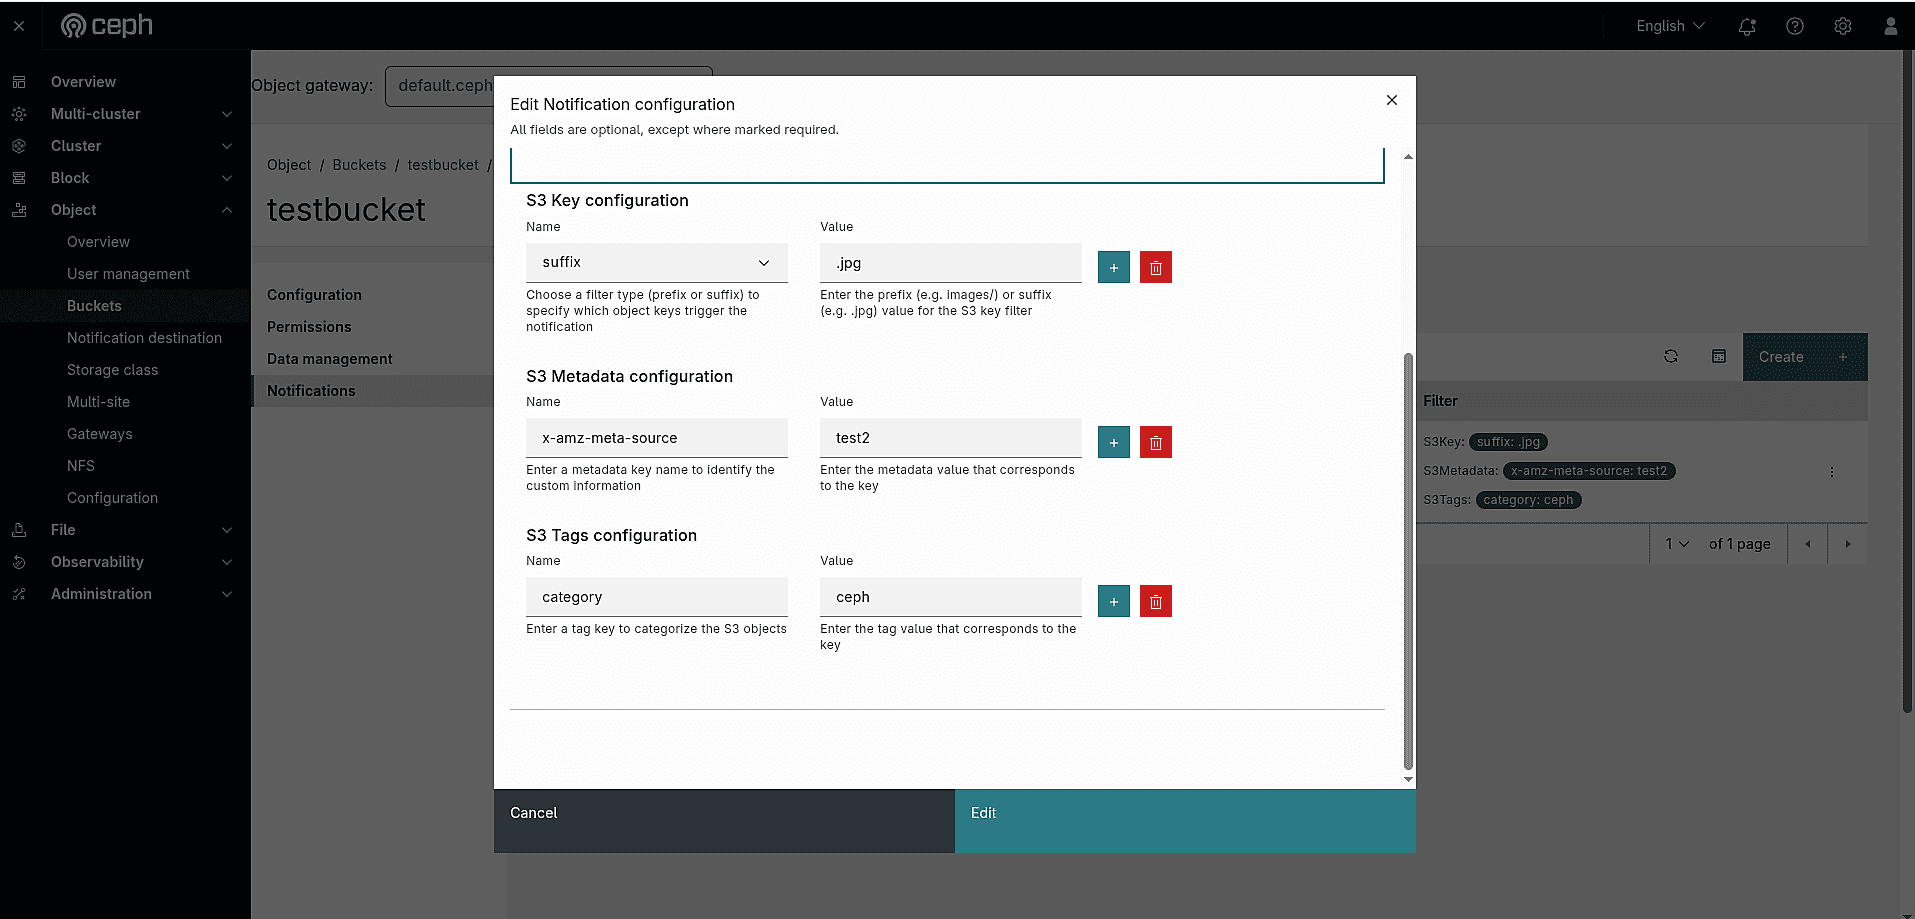 Figure: Edit Notification configuration dialog for
test — Advanced filters section showing the pre-populated S3 Key filter (suffix: .jpg).
Deleting a Notification Configuration 
To remove a notification from a bucket, click the ⋮ action menu on the notification row and select Delete. A confirmation dialog will appear:
Delete Notification Are you sure that you want to delete test?
The Delete Notification button remains disabled until you check the "Yes, I am sure." checkbox. This two-step confirmation prevents accidental deletion. Once checked, the button becomes active — click it to permanently remove the notification configuration from the bucket.
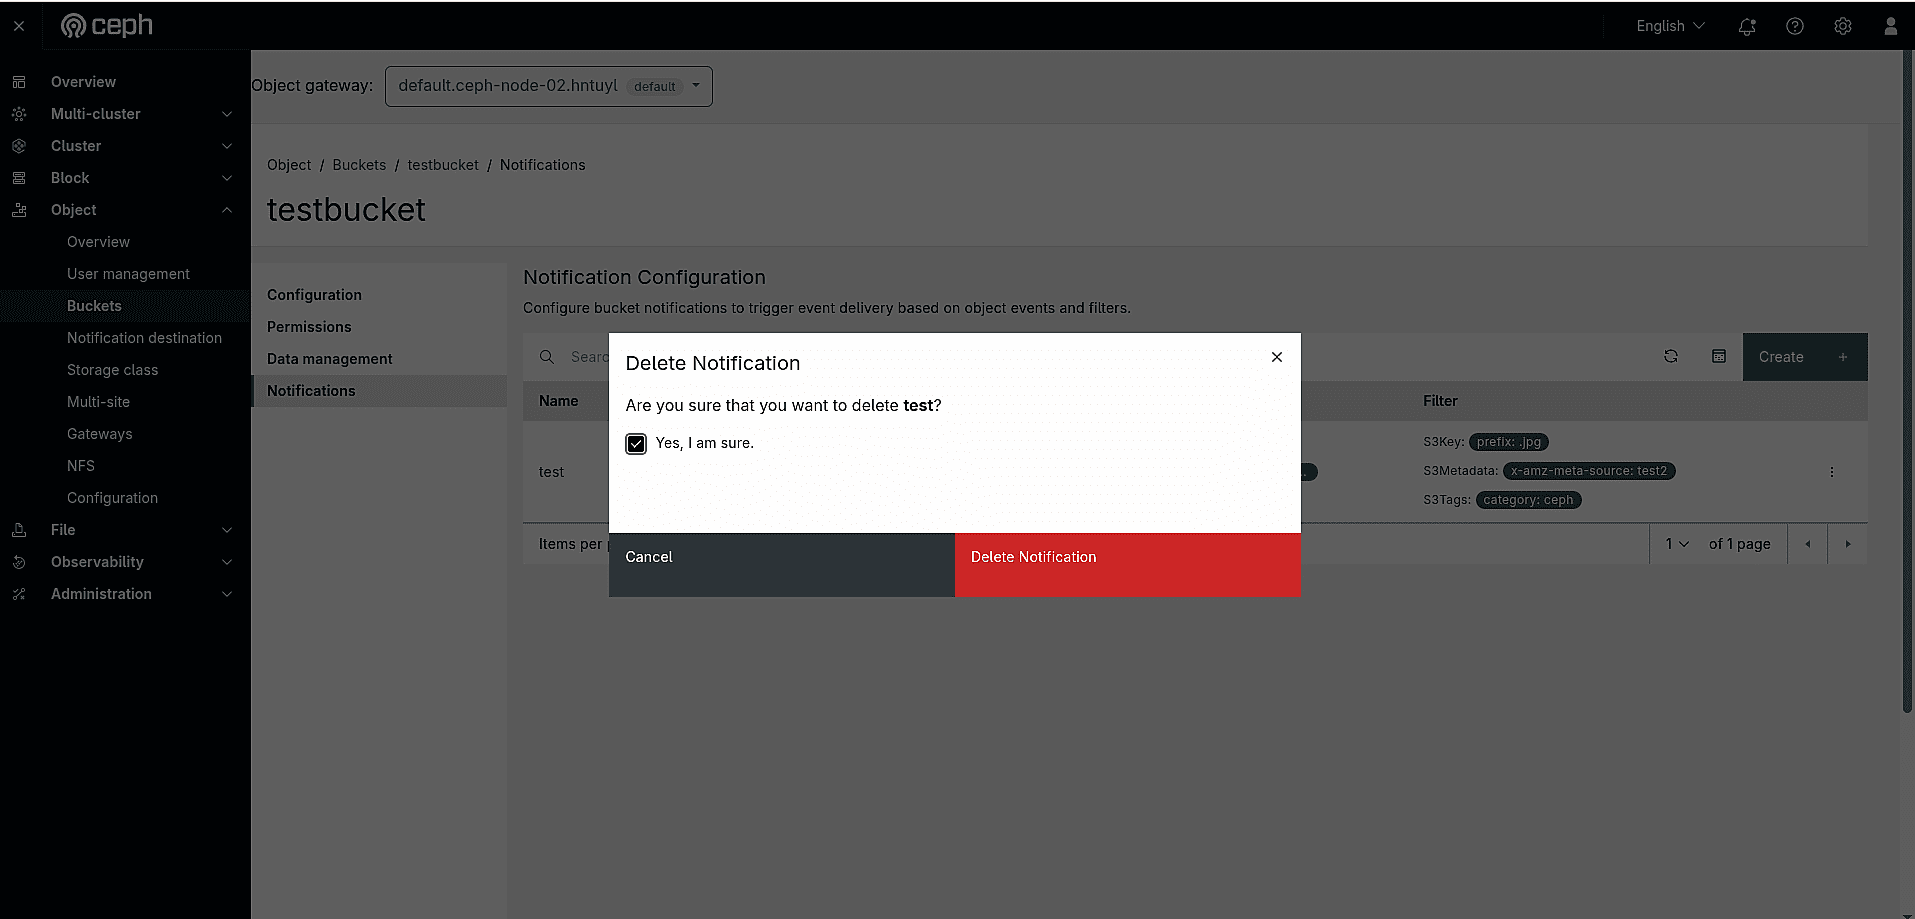 Figure: Delete Notification confirmation dialog for
test, showing the required acknowledgement checkbox before deletion can proceed.
5. Validating End-to-End with a Kafka Server 
To test that notifications are delivered, you need a running Kafka broker. Start the broker and the Kafka UI with Docker Compose:
docker compose up -d kafka
Then create a topic for RGW to publish to, from a shell inside the Kafka container:
docker exec -it kafka bash
kafka-topics --create --bootstrap-server localhost:9082 --topic ui-topic
The new topic appears in the Kafka UI, with no messages yet:
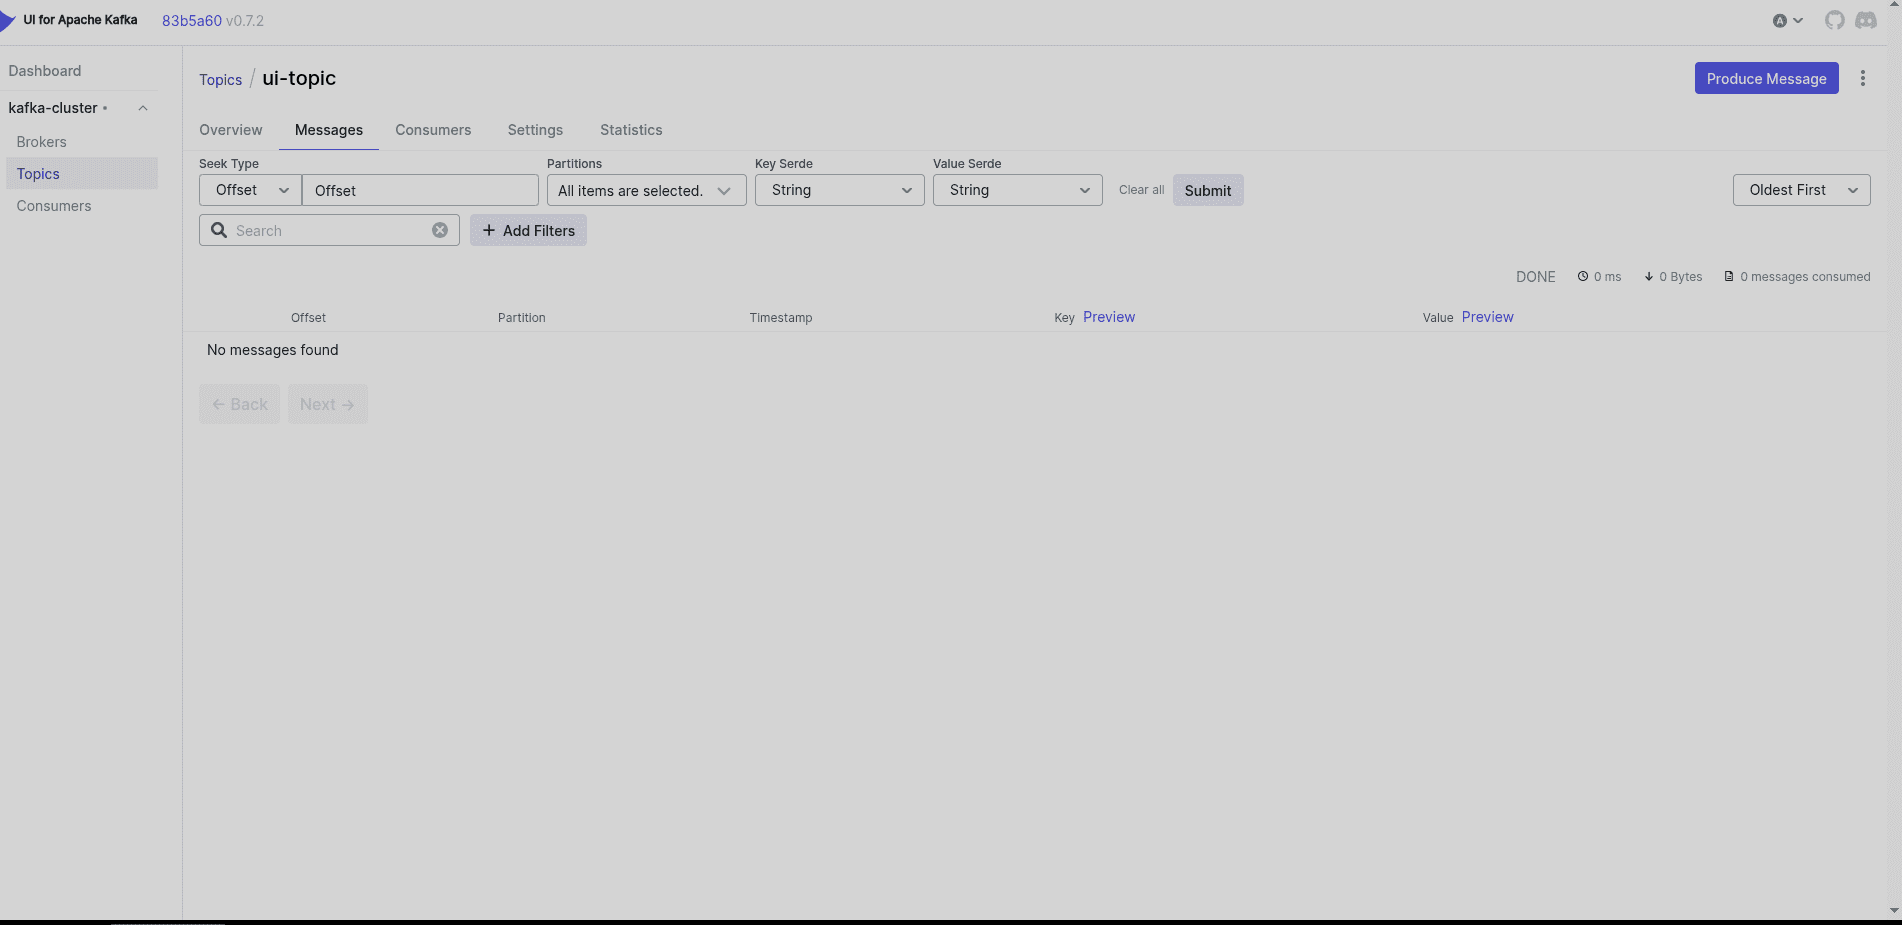 Figure: Topic
ui-topic in the Kafka UI, before any notifications arrive.
Once the topic exists and a bucket notification is configured to target it, upload an object to the bucket. The event message will appear on the topic:
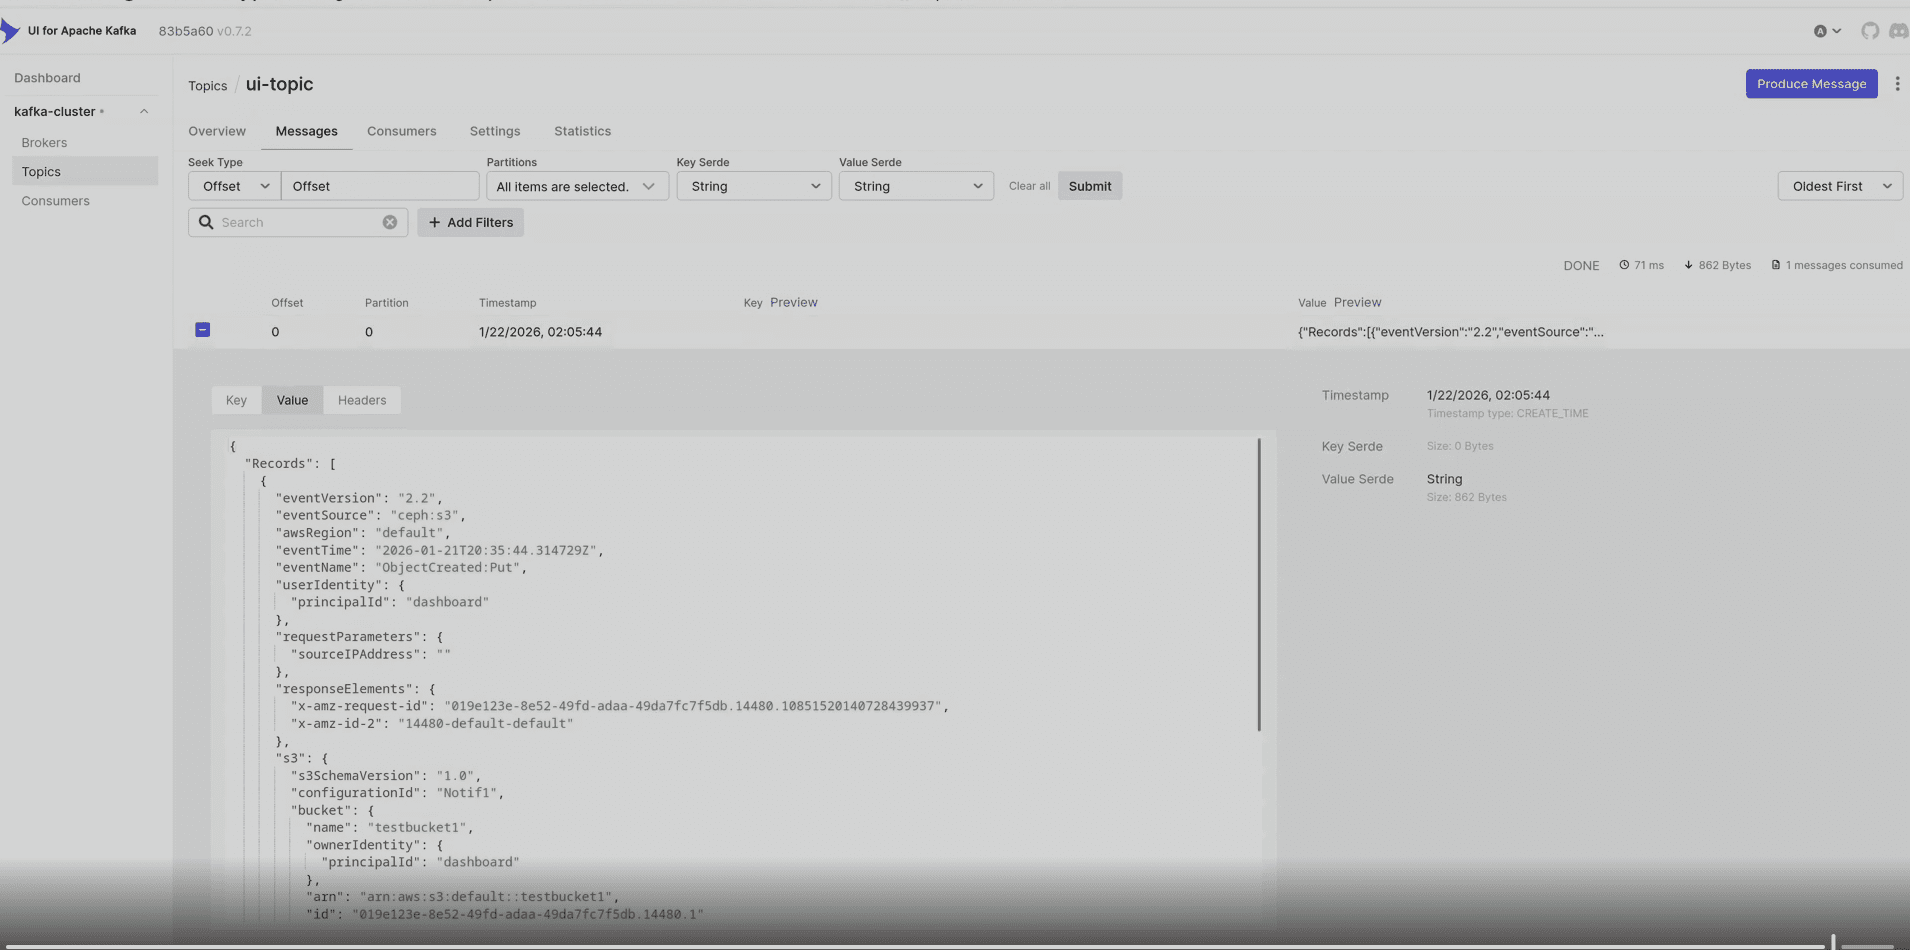 Figure: Notification message received on
ui-topic after an object upload.
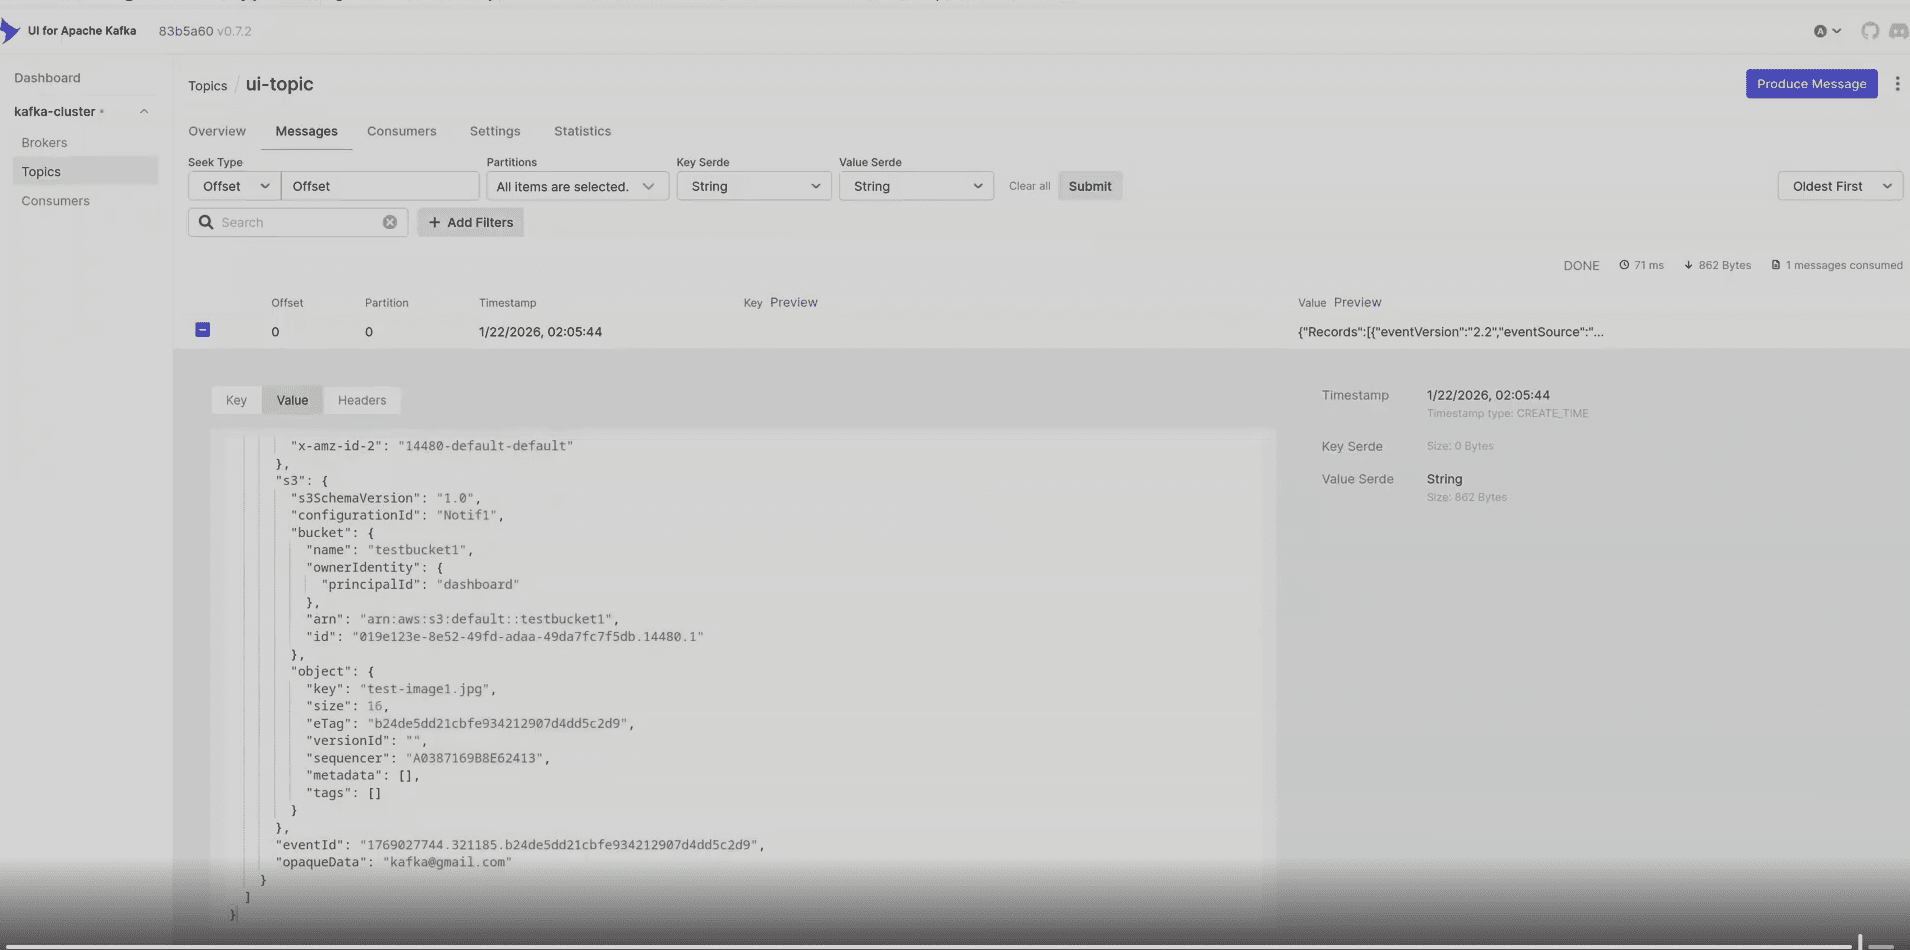 Figure: Detailed view of the notification message payload delivered to
ui-topic.
For the full Docker Compose setup and step-by-step instructions, see the Setup RGW Bucket Notification using Kafka guide.
Conclusion 
Ceph RGW bucket notifications bring event-driven architecture to your object storage — and the Ceph Dashboard makes the entire lifecycle manageable without writing a single API call.
In this walkthrough, we covered the complete end-to-end flow:
- Creating a notification destination — choosing from AMQP, Kafka, or HTTP/HTTPS endpoint types, each with its own protocol-specific attributes (exchange, brokers, vhost, SSL, ACK level) and a set of shared delivery controls (Persistent, TTL, Max retries, Opaque data, Policy).
- Exploring the destination detail view — inspecting the topic's access policy in the Policies tab and the buckets that use it in the Subscribed buckets tab.
- Managing destinations — editing endpoint parameters and safely deleting topics using the two-step confirmation guard.
- Configuring bucket notifications — attaching a notification to a specific bucket by selecting a topic, an S3 event type, and optional Advanced filters (S3 Key prefix/suffix, Metadata, and Tags) to precisely control which object events get published.
- Managing bucket notifications — editing existing notification configurations to update topics, events, or filters, and deleting them with the same confirmation guard.
Whether you are building real-time image processing pipelines, streaming audit logs to a SIEM, triggering cache invalidations, or ingesting data into a Kafka consumer, the Ceph Dashboard gives you a clear, guided interface to configure and maintain bucket notifications at scale. Take the opportunity to explore this feature in your Ceph cluster and unlock event-driven workflows for your object storage.
Further Reading 
- Ceph RGW Bucket Notifications — Official Documentation — the official Ceph reference for RGW bucket notifications, covering the SNS-compatible API, supported event types, filter rules, and endpoint configuration for AMQP, Kafka, and HTTP.